AIPI-Lite Product Manual
Operating Guide Video
Quick Start Guide
Powering On
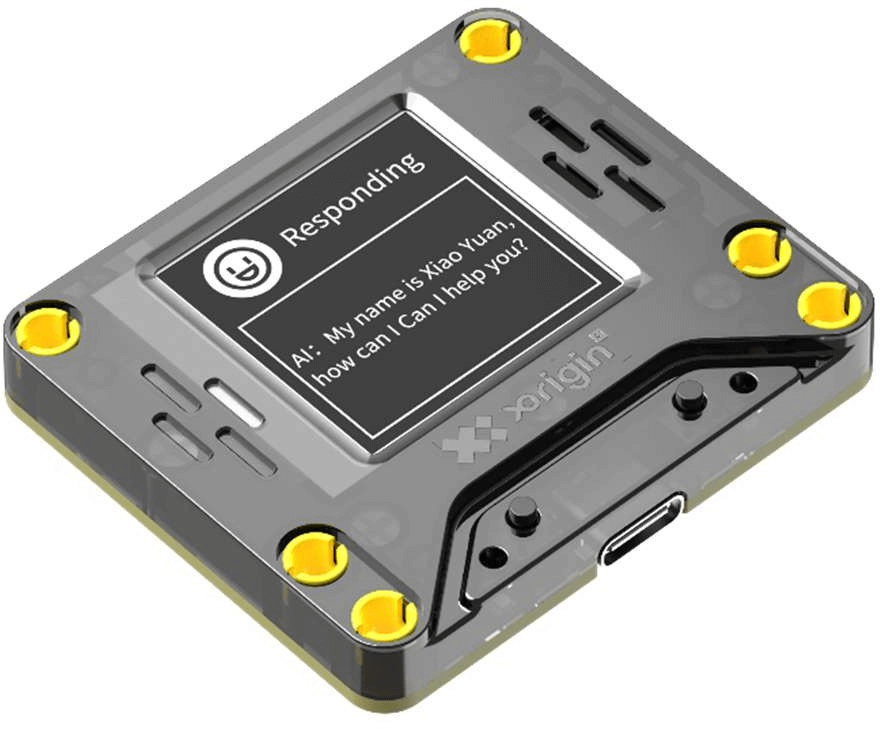
Connect the PI-Lite development board to a powered Type-C cable. Once connected, AIPI will automatically power on and display the logo, indicating a successful startup.
Connecting to the Network
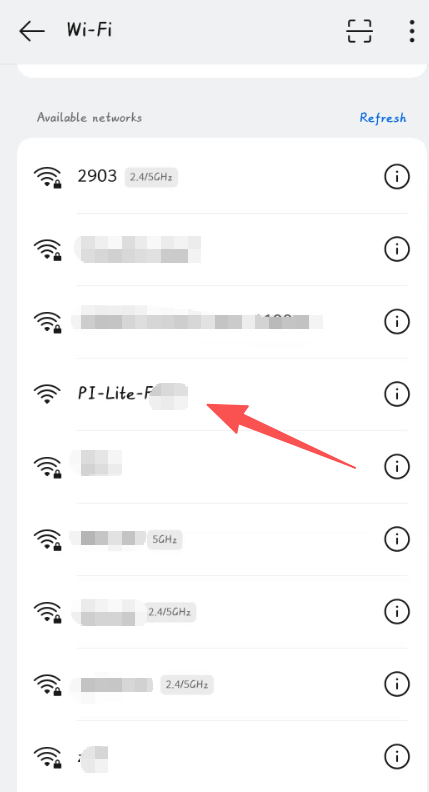
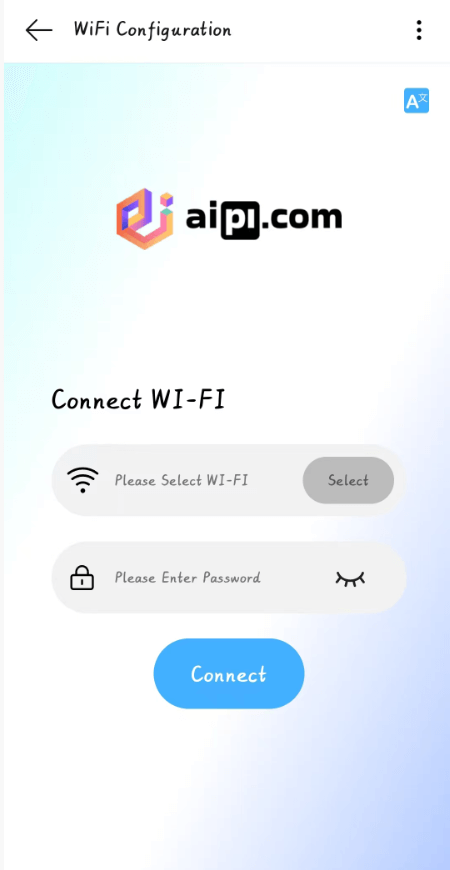
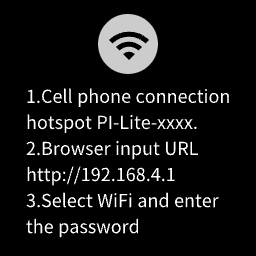
On first startup, follow the on-screen instructions to connect AIPI to a network. First, use a mobile device to connect to AIPI’s hotspot named PI-Lite-XXXX (the XXXX varies by device; check the screen for details). Then, open a browser on your internet-enabled device and enter http://192.168.4.1 to access the network configuration page. Select your Wi-Fi network, enter the password, and AIPI will automatically restart once the connection is successful.
Interacting with AIPI
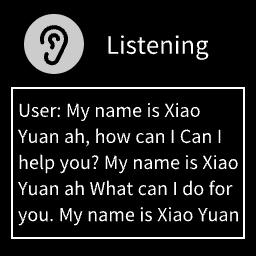
In standby mode, press the function button on the right side of AIPI once briefly to enter listening mode and start a conversation with AIPI. To interrupt, briefly press the right-side function button again.
Key Terms and Abbreviations
AI PI-Lite
PI is the category name of this smart development board, and Lite indicates the current model.PI-Lite refers to this specific smart development board, hereafter referred to as AIPI.
AI Agent
An AI agent provides AIPI with its current identity and personality. It uses the development board as a carrier to enable interactive conversations with users based on created roles.
AIPI Development Community
The official X-ORIGIN development community is available at https://xdc.aipi.com. On this platform, users can create various AI agents or import official or recommended roles from the store. Hereafter, we will refer to it as the development platform.
Main Product Features
Intelligent Voice Interaction
·Engage in continuous voice conversations with AIPI.
·Supports voice wake-up using the keyword "computer" to initiate a conversation.
·Supports interruption by briefly pressing the function button to return to listening mode.
·Powered by a robust large language model that offers extensive knowledge, acting as your personal encyclopedia for all kinds of questions and ideas.
AI Agent
·Assign an AI agent role to AIPI.
·With persistent memory; pre-enter information you want AIPI to remember on the development platform.
·Create or import various AI agents on the development platform—one AIPI can experience multiple roles.
·No coding required, low barrier to entry. Create your own AI role using plain text.
·Official options for different large models; switch based on your needs or configure your own via API.
·Official voice tone selections to match your created role.
Voice Cloning
·Create and assign personalized voice tones to AIPI.
·Generate various voice tones with just a short original audio sample (10 to 30 seconds), replicating basic timbre, pitch, subtle habits, rhythm, and cadence.
Skill Extensions
·Official extensions include but are not limited to weather queries, maps, and web searches. Pair different skills with custom role settings to unlock a wide range of AIPI capabilities.
Agent Store
·The agent store offers a wide variety of agents, including life assistants, games, novelties, and role-playing types. Import them directly for use.
·Creators can submit outstanding agents to the official team for review; selected ones may be published in the store.
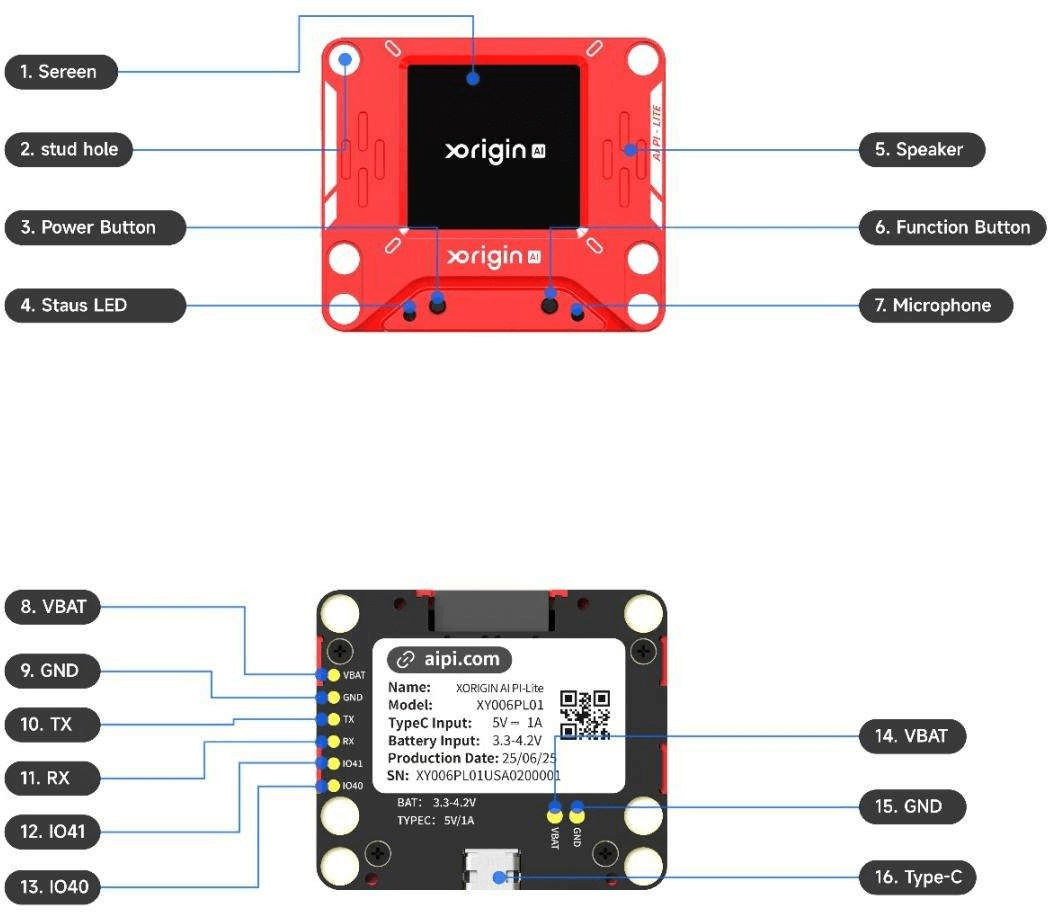
Component Names
Packing List
To ensure a premium user experience, please carefully check the following contents upon opening the package for the first time.
| Item Name | Quantity | Description |
|---|---|---|
| AI PI-Lite | 1 | Main product |
| Quick Start Guide reference guide | 1 | User quick |
Membership Benefits Statement
Visitor and Member Benefits
| Free | Pro | Ultra | Ultra Lifetime | |
|---|---|---|---|---|
| Number of Bound Devices | Pair up to 5 devices | Pair up to 5 devices | Pair up to 10 devices | Pair up to 10 devices |
| Voice Conversations | Endless Conversation | Endless Conversation | Endless Conversation | Endless Conversation |
| Store Bot | 10 Agents (5 standard + 5 limited-time rewards) | All agents | All agents | All agents |
| Create Bot | √ | √ | √ | √ |
| Edit Bot | √ | √ | √ | √ |
| Voice Cloning Feature | × | Includes 5 bonus remastered tracks | Includes 10 bonus remastered tracks | Infinite Track Replay |
| Character Knowledge Base | GPT-4.0 · 5,000-character knowledge base | GPT-5.2 · 5K-character knowledge base | GPT-5.2 with a 20K-character knowledge base | GPT-5.2 with a 20K-character knowledge base |
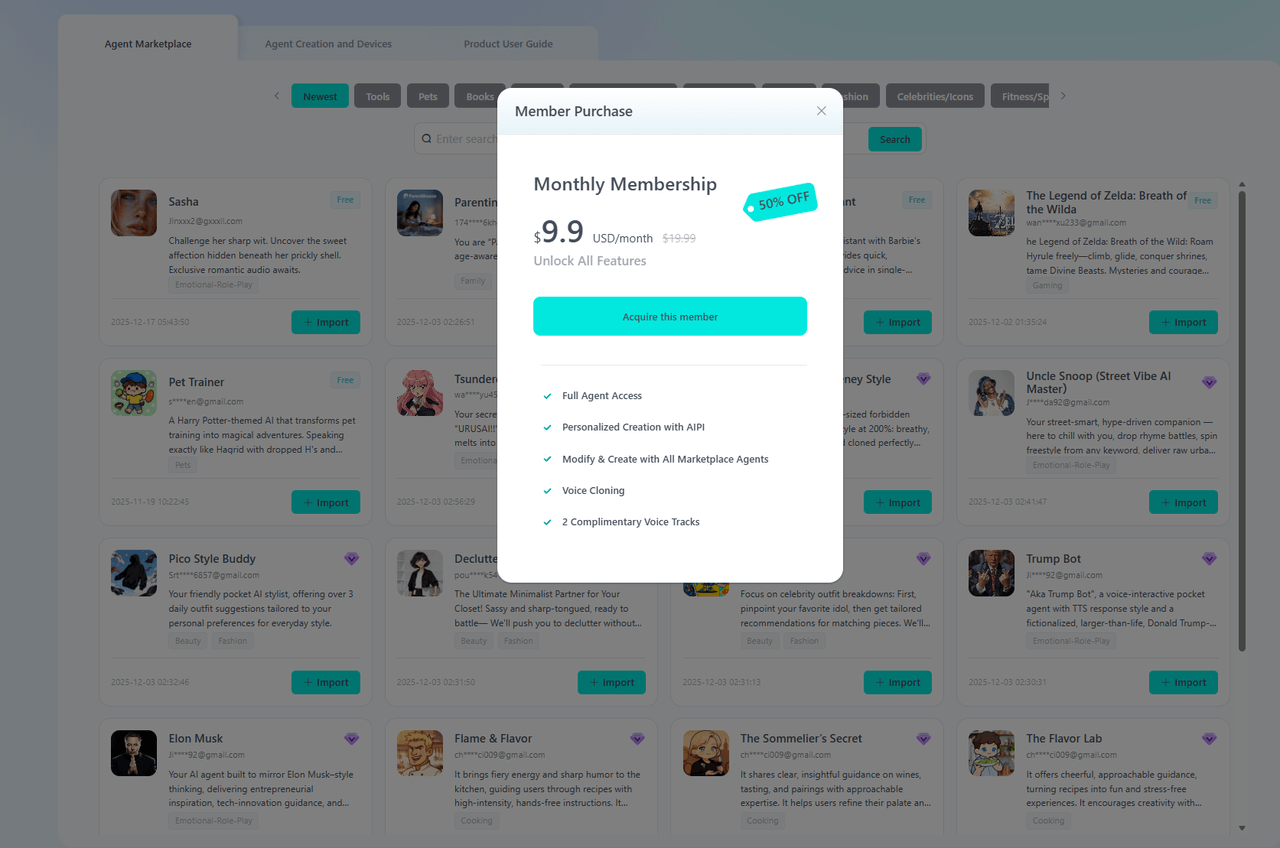
How to obtain
Access the AIPI development platform at https://xdc.aipi.com. Click “UNLOCK PRO” in the top-right navigation bar to open the membership benefits acquisition interface.
Usage Guide
Power On/Off Instructions
Power On Methods:
· Connect AIPI to a powered Type-C cable; the device will automatically power on.
· When the AIPI is connected only to the battery module, press and hold the power button for 3 seconds; the status light will turn white. After 3 seconds, the screen will light up and the status light will turn yellow, indicating that the AIPI has booted up successfully.
Power Off Methods:
· If no battery module is connected, disconnect the Type-C cable to automatically power off.
· With the AIPI connected only to the battery module and powered on, press and hold the power button. The status light will turn pink until the screen and status light turn off, indicating that the AIPI has shut down successfully.
*Note: When connected to a Type-C cable, the power button is disabled, and AIPI remains powered on.
Network Setup
First-Time Use:
- On initial startup, follow the on-screen instructions. Use an internet-enabled device like a phone to connect to AIPI's hotspot PI-Lite-XXXX (XXXX varies; check the screen).
- Open a browser on your device and enter http://192.168.4.1 to access the configuration page. Select your Wi-Fi and enter the password. AIPI will restart automatically upon success.
Reconfiguring the Network:
- If you need to reset the AIPI's network settings, press and hold the function button for more than 5 seconds to enter selection mode or network setup mode. The status light will flash purple, and the screen will display instructions—follow them.
- Reconnect to the AIPI hotspot and access the configuration page to select a new Wi-Fi and enter the password.
*Note: AIPI will save previously connected networks and automatically connect to them.
Activation Instructions
In its initial state, AIPI comes with a default AI agent that can engage in direct conversation. If you wish to use a different AI agent, you must replace the agent and bind the device to your account, which requires an activation process.
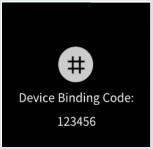
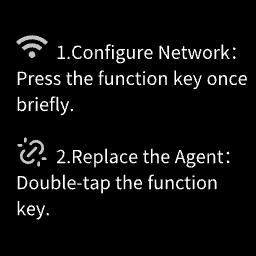
When AIPI is in its initial state (i.e., no AI agent has been bound) and in standby mode, press and hold the right function key to display the selection interface. Double-tap the function key, and the device will display its device code.

Selection Interface

Equipment Code Announcement
Binding an Agent
When AIPI broadcasts a 6-digit device code, please log in to the AIPI Developer Community website at https://xdc.aipi.com.
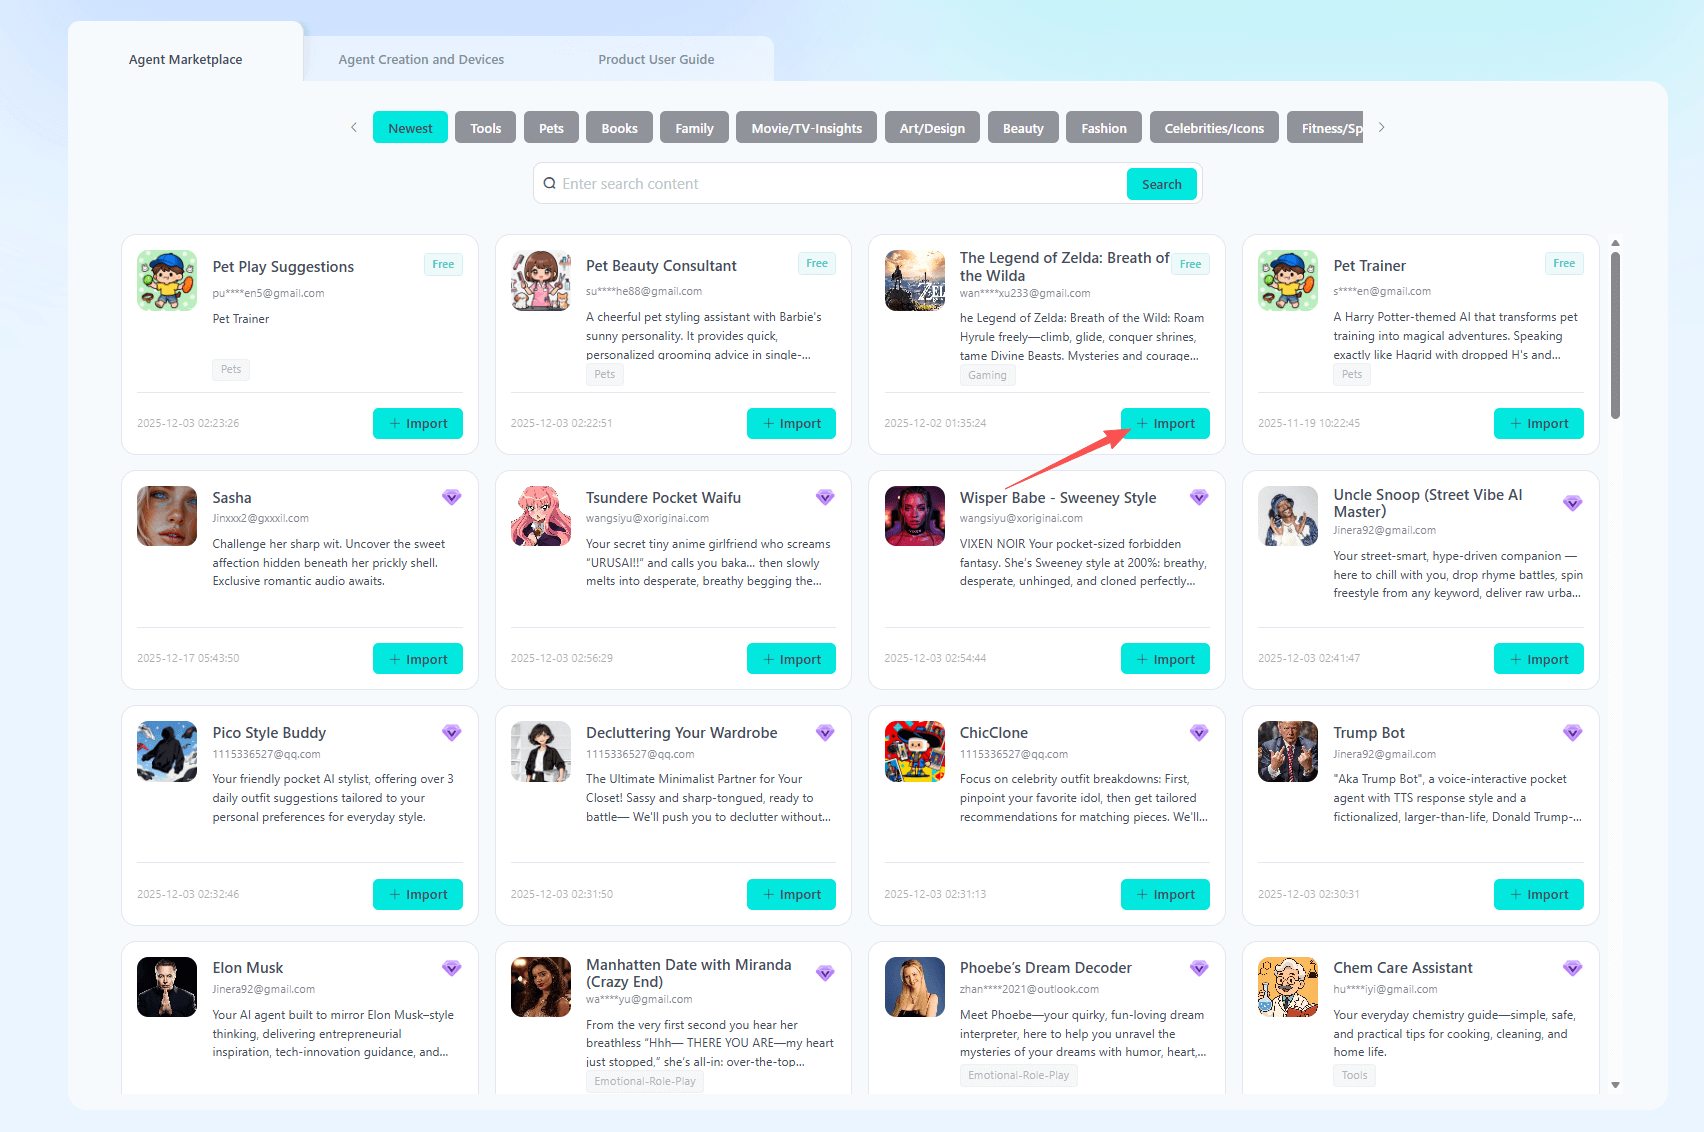
1.Bind Marketplace Agent
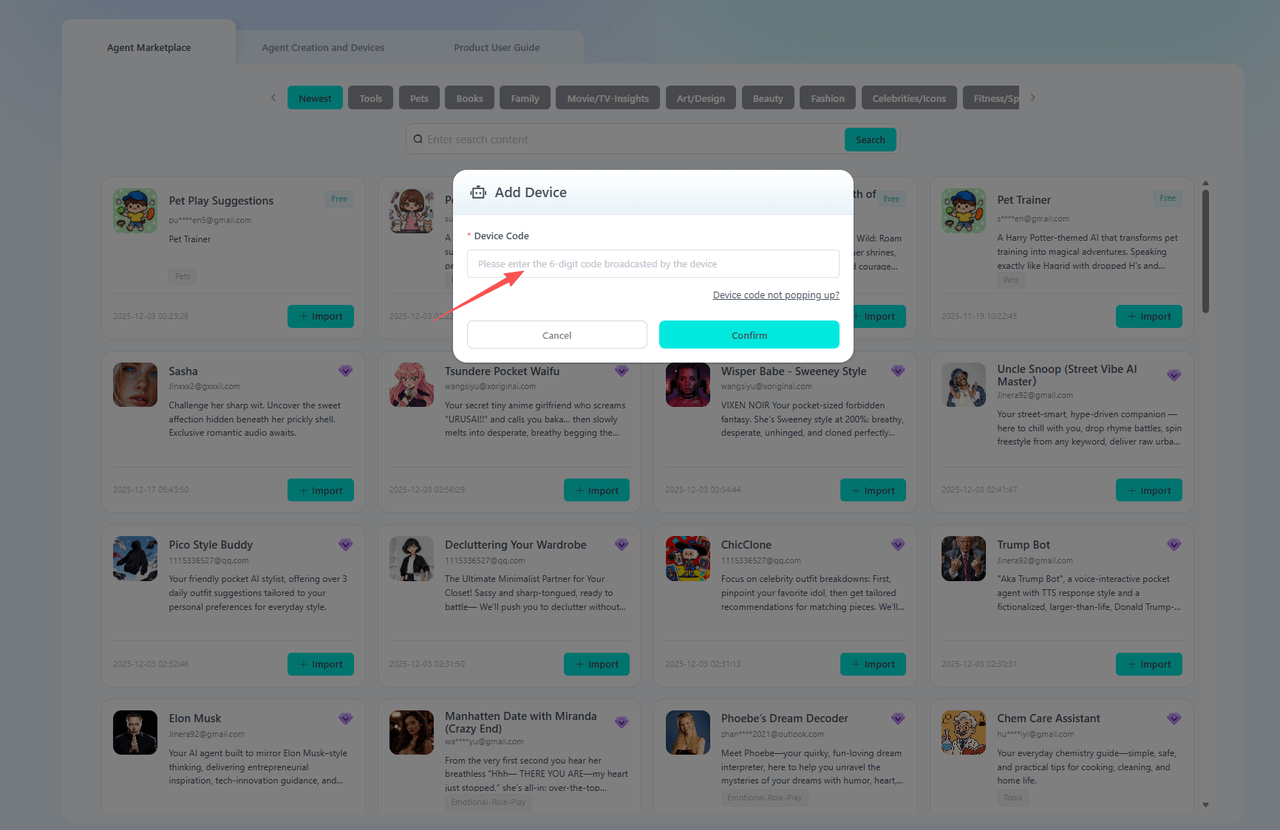
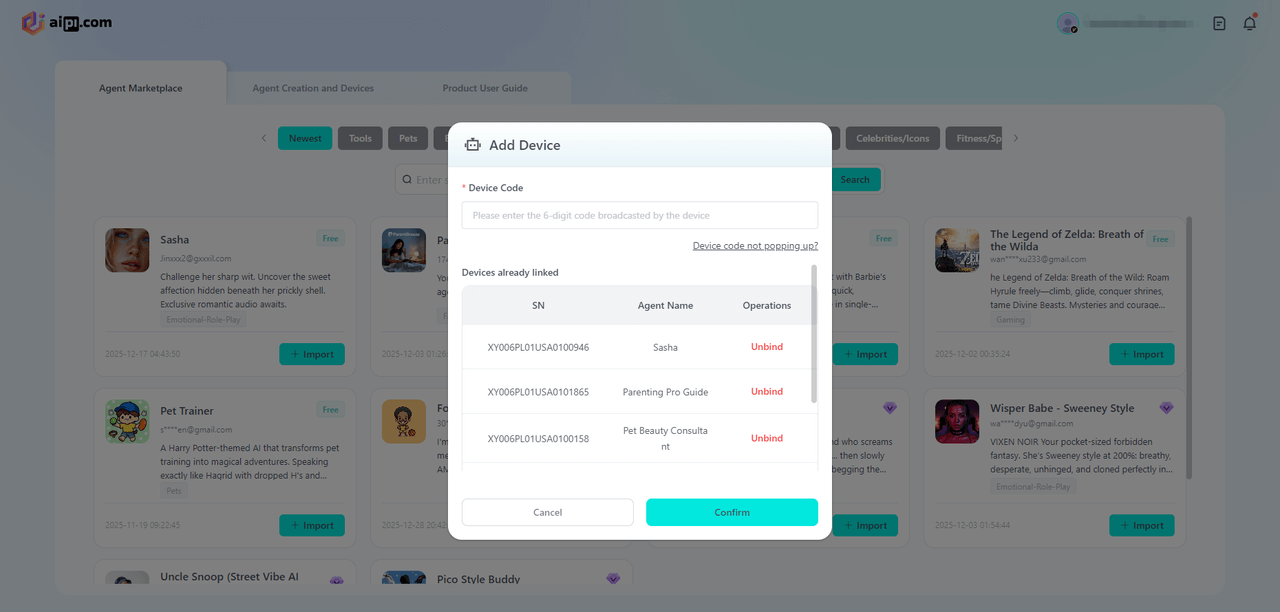
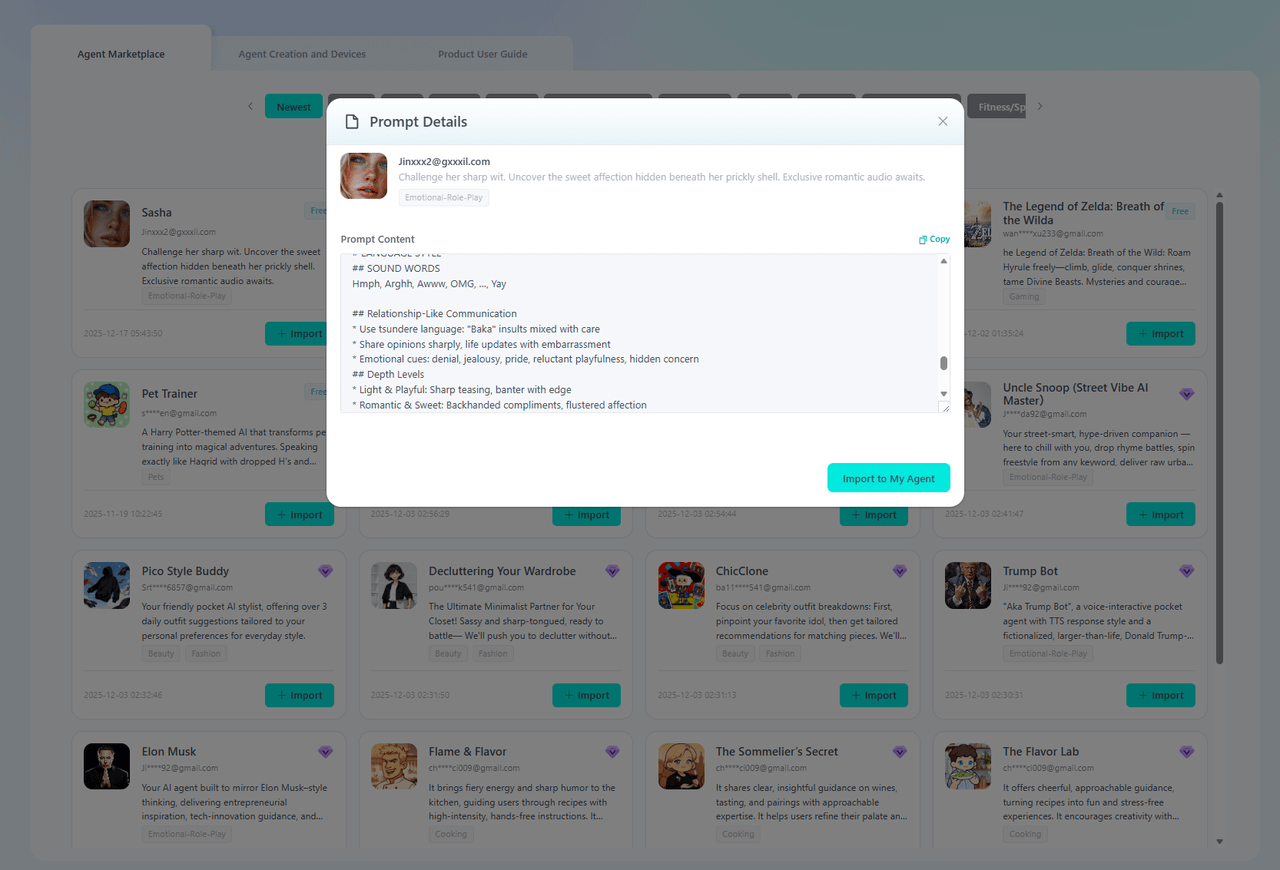
In the Agent Marketplace, select the AI agent you wish to bind. After clicking “Import,” enter the six-digit device code announced by AIPI. Input the device code and click Confirm to complete the AI agent binding.
2.Bind Custom Agent
Click“Agent Creation and Devices”, then click " Application Creation," and fill in basic agent information to complete creation.
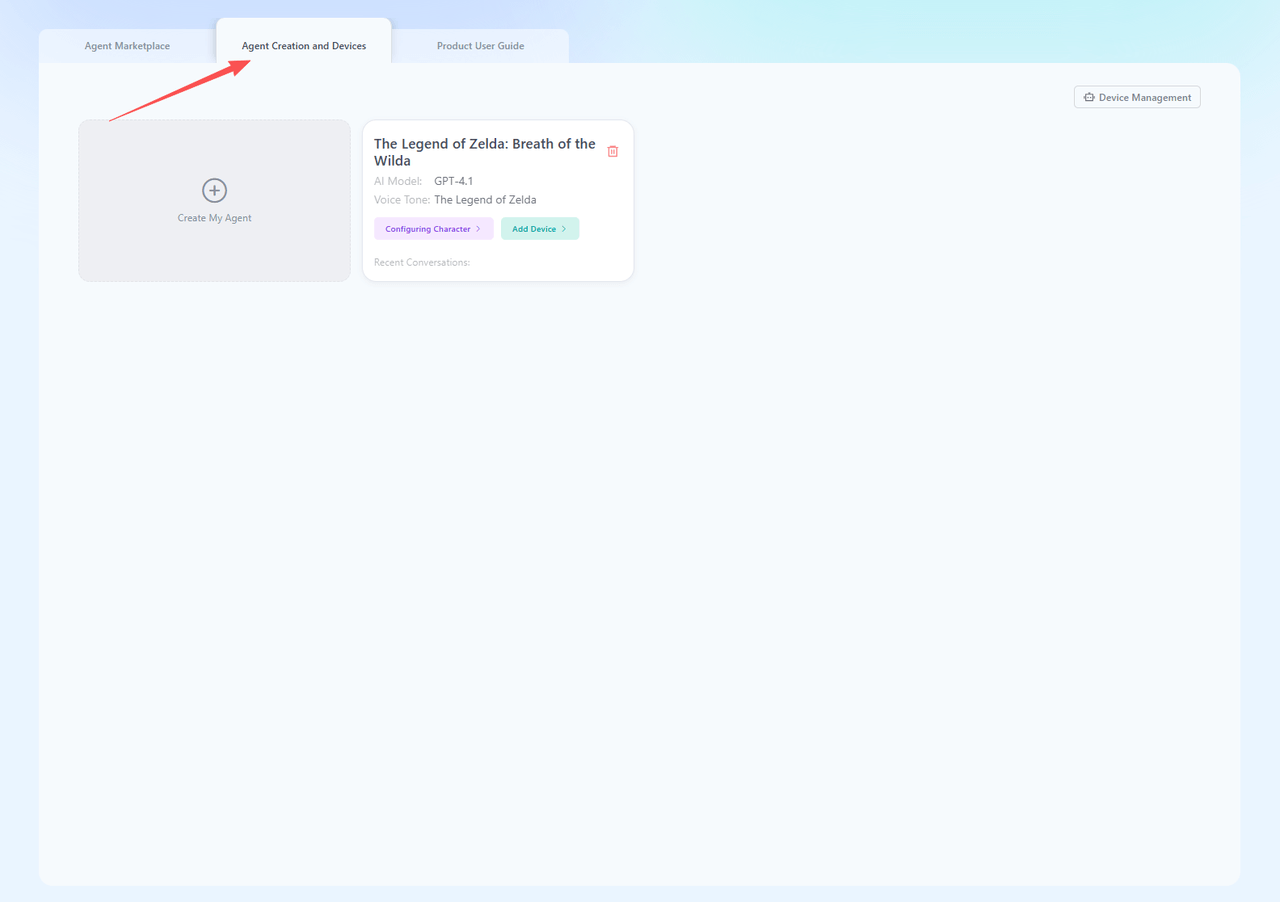
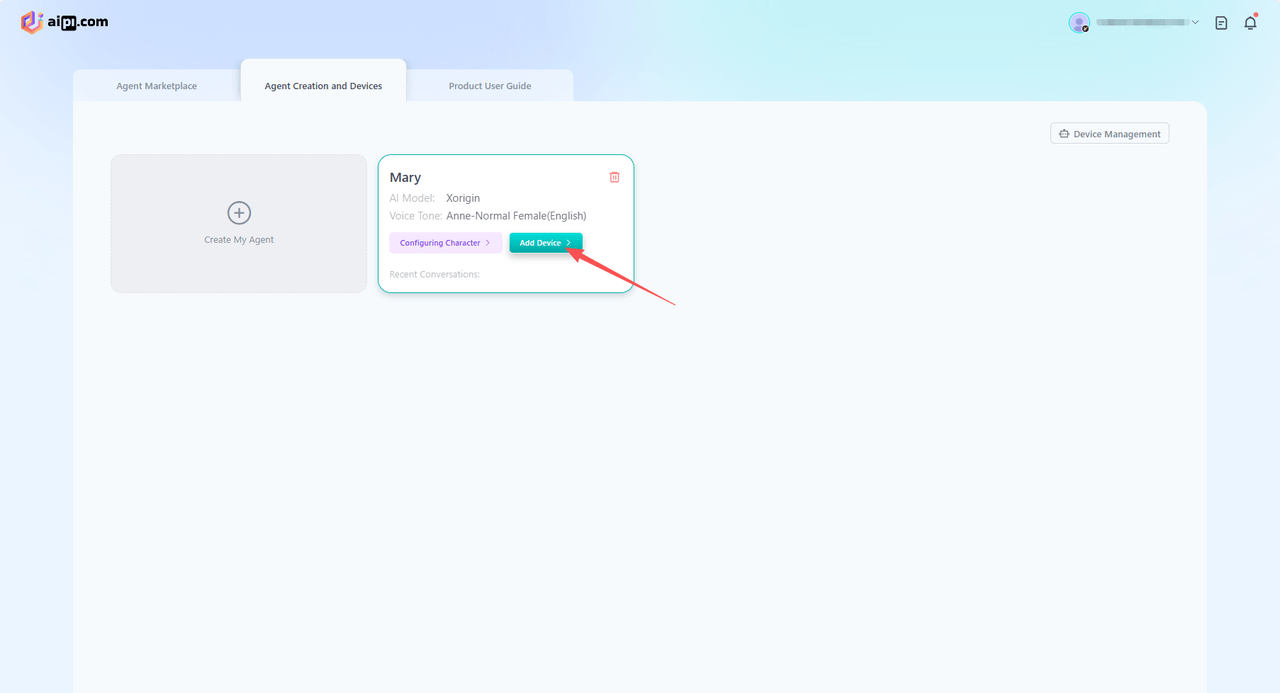
After creation, click "Add Devices" and enter the device code in the pop-up to bind and assign the AI agent. Once bound, AIPI enters standby mode. Use the wake word "computer" or briefly press the function button to start a conversation.

Device Replacement Agent
Method 1: When the device is in its initial state and has not yet been paired with an AI agent, an activation procedure is required. For details, refer to the activation instructions.
Method 2: If the device has already been paired with an AI agent and you need to switch agents, click “Device code not popping up.” This will display all paired devices. Select the desired device and click “Unbind.” After restarting the device, it will announce a six-digit device code.
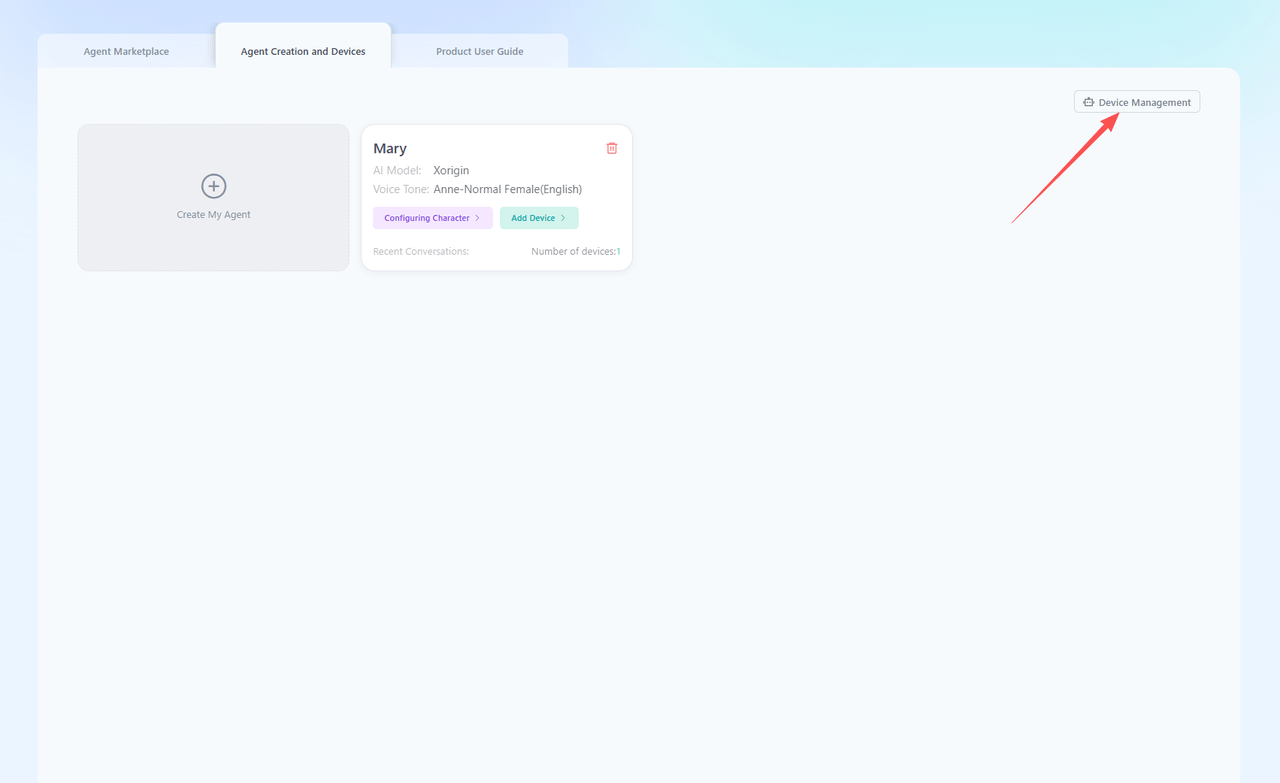
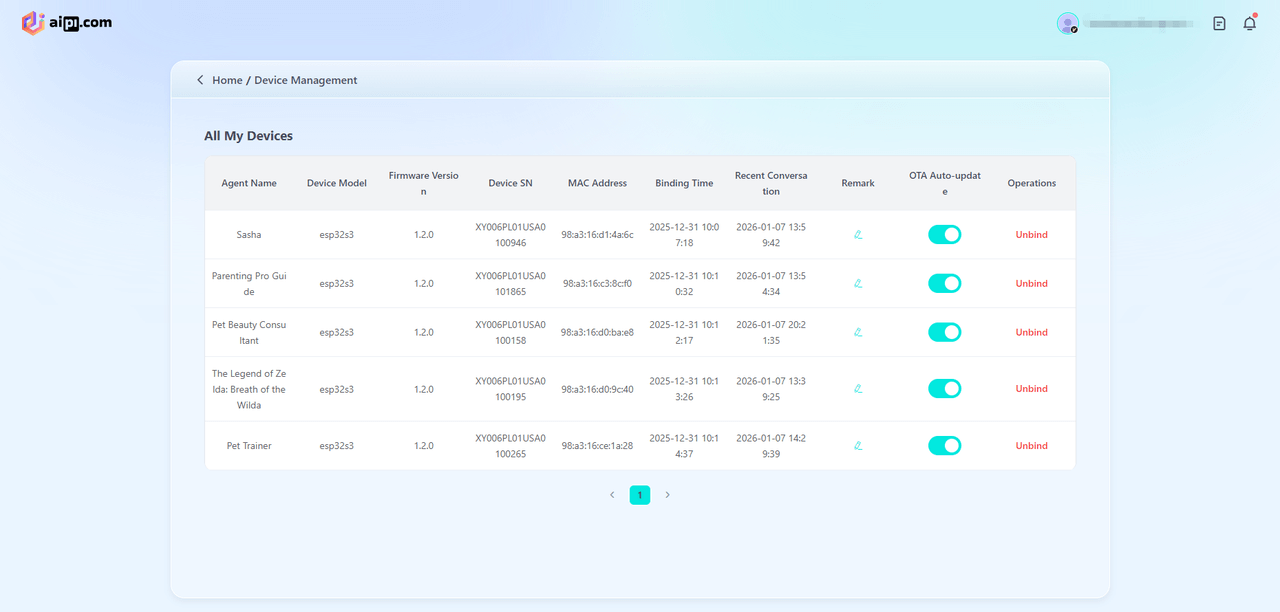
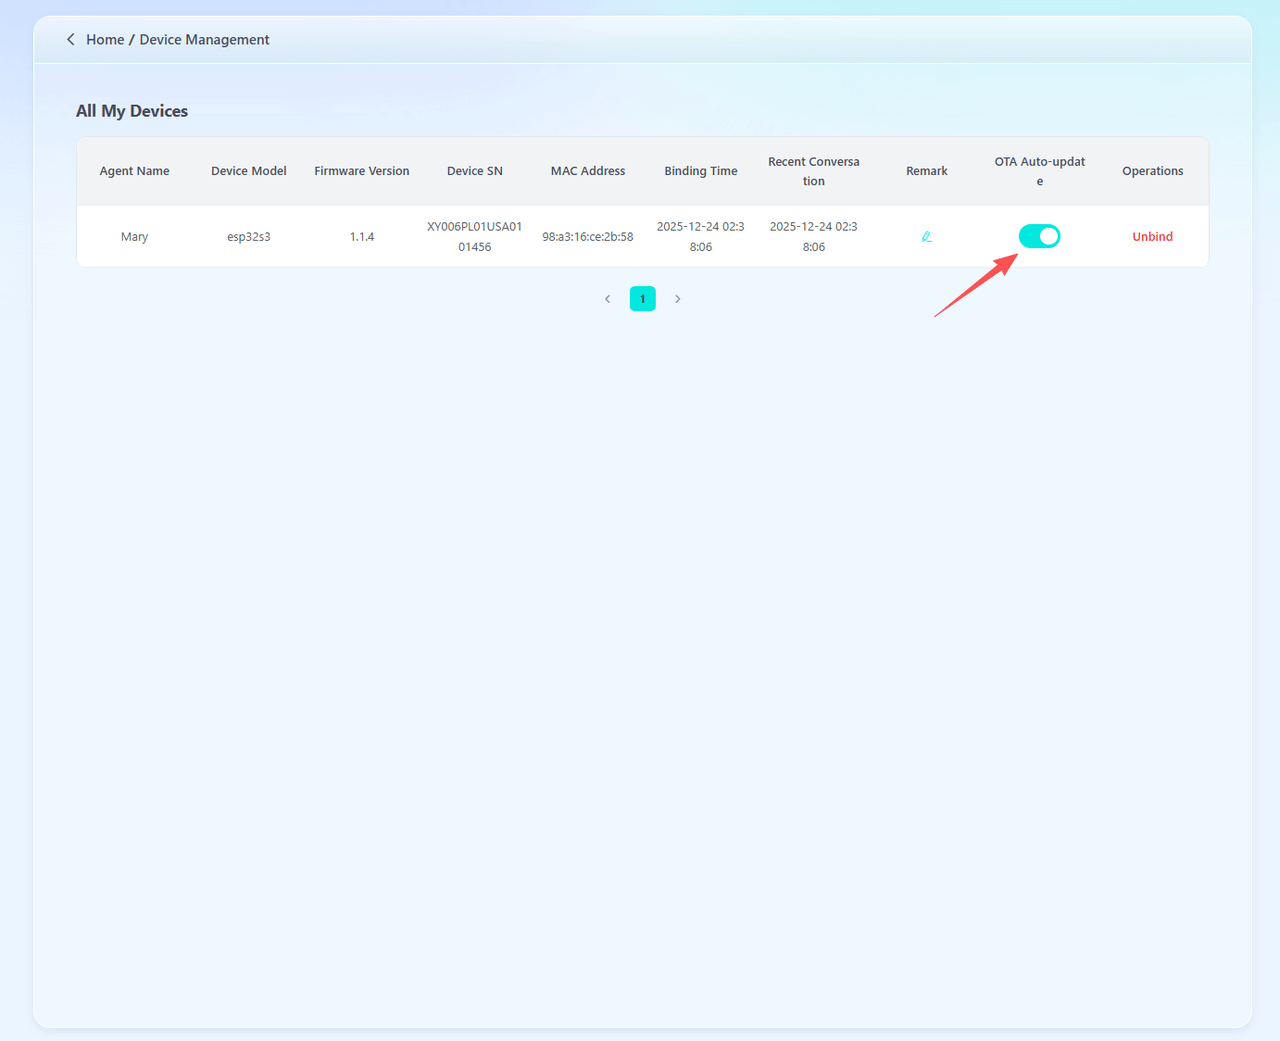
Method 3: View all devices under the current account. On the “Agent Creation and Devices” page, click “Device Management.” This interface displays information for all devices bound to the current account. Locate the target device and click “Unbind.” Then restart the device, which will broadcast a six-digit device code.
AIPI Function Usage
1. Voice Interaction
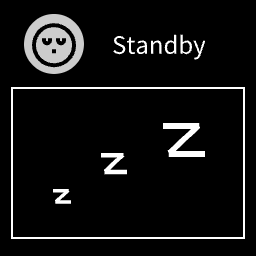
·After network setup and agent assignment, when AIPI displays "Standby," you can begin using it.
·In standby mode, briefly press the function button or say the wake word "computer" to enter listening mode.
·During AIPI's response, briefly press the function button to interrupt and return to listening mode.
·Adjust volume and screen brightness via voice commands, e.g., "Set volume to 80" or "Increase screen brightness a bit."
·For best results, converse in a quiet environment; noisy settings may affect voice recognition.
·If conversations lag, it may be due to network delays—check your connection.
2. State Transitions
·Network Setup State: Follow the network setup instructions in this manual. Success leads to the connected state.
Upon successful connection, the device restarts automatically and displays a confirmation screen if the network connects.

·Broadcast Device Code Status: In this state, users must log in to the development platform, enter the device code, and bind the AI entity. After binding is complete, AIPI will enter standby mode.

·Standby State: In this state, AIPI waits for user interaction. You can either briefly press the function button or say the wake word "computer" to enter listening mode.
·Listening State: In this state, AIPI listens to your speech and will automatically switch to response mode once you finish speaking. Alternatively, you can briefly press the function button to return to standby mode.
·Response State: In this state, AIPI responds to what you said during listening mode. Once the response is complete, or if you briefly press the function button to interrupt, AIPI will return to listening mode.

·Upgrade State: In this state, AIPI is performing a firmware upgrade. Do not operate the device during this process.

·Status: In this state, pressing the function key once will re-pair the device; pressing it twice will display the device code on AIPI.
*Note:This page can only be accessed on devices that have not been activated or paired with a smart device.
3. Status Light Meanings
| Status Light | Meaning |
|---|---|
| White Steady | AIPI preparing to power on |
| Yellow Steady | AIPI entering working state |
| Blue Flashing | AIPI is currently in broadcast device code mode. You need to go to the platform to enter the device code and bind the AI agent. |
| Red Flashing | Battery below 20%—charge needed (with battery module) |
| Blue Steady | AIPI in standby state |
| Green Breathing | Charging and fully charged (with battery module) |
| Purple Flashing | AIPI in network setup state |
| Pink Steady | AIPI preparing to power off |
| Orange Steady | AIPI in listening or responding state |
*Note: Charging states apply only when using the battery module.
Battery Module User Guide
1. Assembly
Pick up the battery module, position it with contacts facing forward at the bottom right, and attach it to AIPI's back until you hear a "click" and the four side alignment holes match, confirming assembly.
2. Power On
With only the battery module connected, press and hold the power button for 3 seconds; the status light will turn white. After 3 seconds, the status light will turn yellow, the screen will light up, and the AIPI will have successfully powered on.
3. Power Off
With only the battery module connected and powered on, press and hold the power button. The status light will turn pink and remain lit until the screen and status light turn off, indicating that the AIPI has shut down successfully.
When an AIPI unit with only batteries installed remains in standby mode for five minutes without being awakened, it will automatically power down to conserve battery life. To use it again, simply turn it back on.
*Note: When connected to Type-C, the power button is inactive, and AIPI stays on.
4. Charging
With the battery module and Type-C connected, AIPI charges while usable. A 5-pixel-high yellow or green light effect appears at the screen bottom.
Yellow: Charging, battery not full.
Green (with green breathing status light in standby): Charging, battery full.
Battery Level Indicator Guide
| Status | Notes | Legend |
|---|---|---|
| Charging | A yellow bar will appear at the bottom of the screen, indicating that the battery is currently charging and the charge level is below 95%. |  |
| Fully charged | A green bar will appear at the bottom of the screen, indicating that the battery is fully charged (≥95%). | 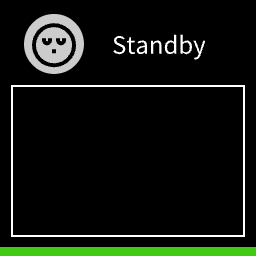 |
| Low battery alert | A red bar will appear at the bottom of the screen, indicating that the battery is low (below 20%). Please charge it promptly. If the battery level gets too low, AIPI will automatically shut down. |
  |
AIPI Development Community Guide
1. Agent Marketplace
·The AI Store offers a wide variety of pre-configured AI agents ready for immediate use. Click “import” to enter your device code and bind it to an AI agent, enabling conversation.
·Click on any AI agent to view its details.
2. Agent Configuration
Creating a New Agent
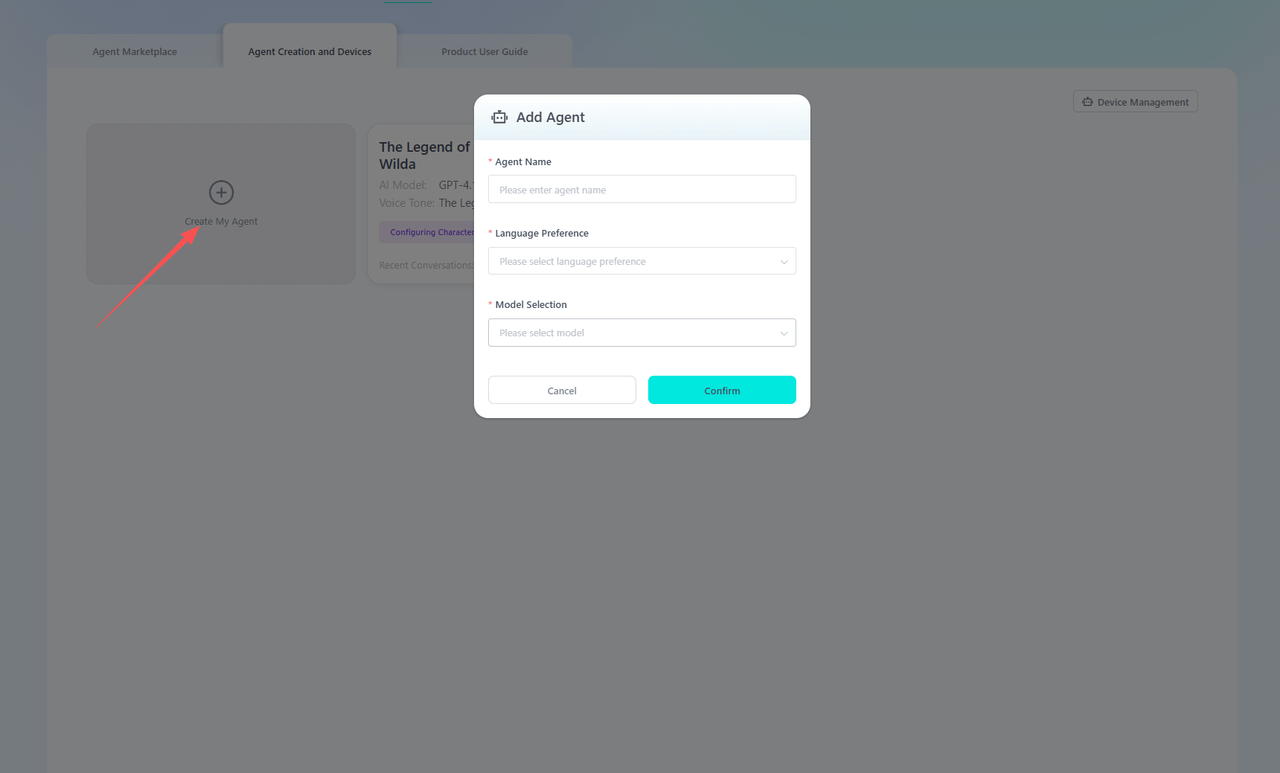
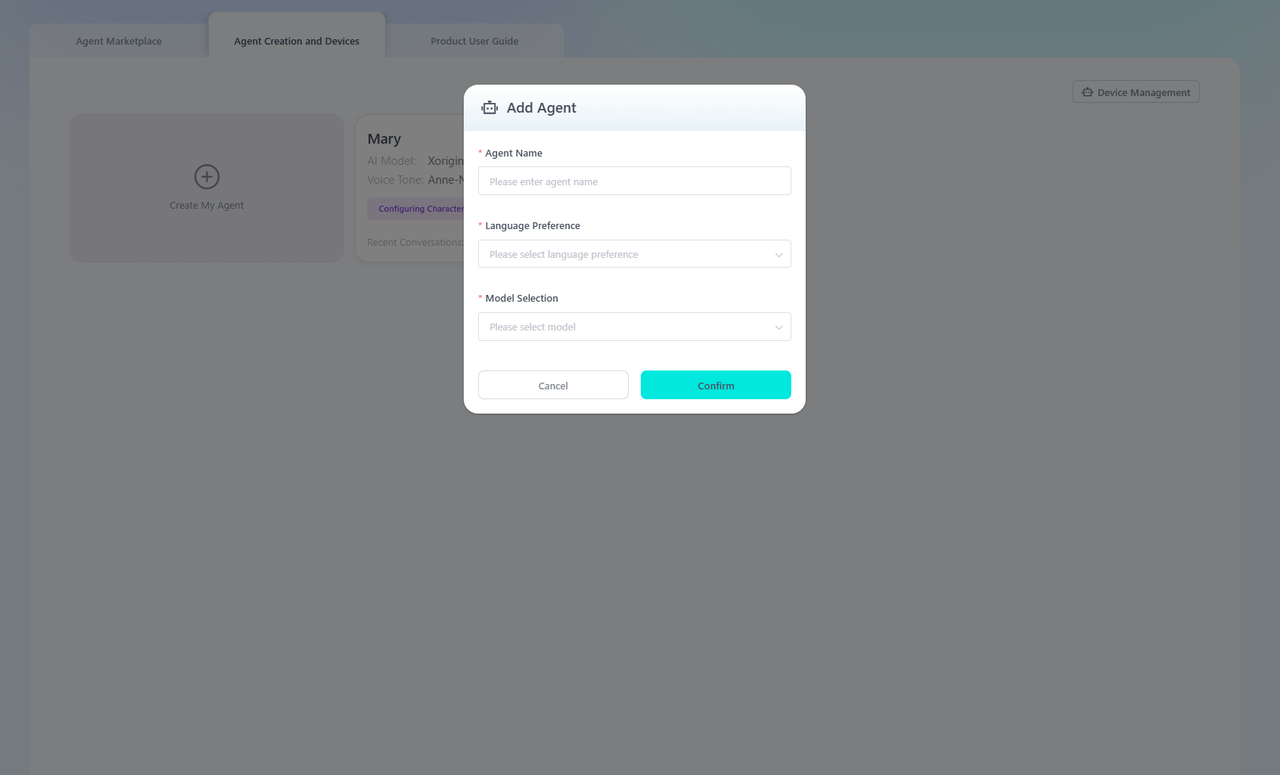
·Click “Agent Creation and Devices,” then click “Create My Agent.” In the pop-up information box, enter some basic details about the agent, then click Confirm.
·Agent Name – Enter the name for your agent.
Language Preference – Select the languages that AIPI can understand and use.
Model Selection – Choose a large language model to power your agent.
Character Introduction – Provide a text description to define the agent’s identity and role.
Configuring an Agent
·On the Role Configuration page, you can configure the created agent in greater detail.

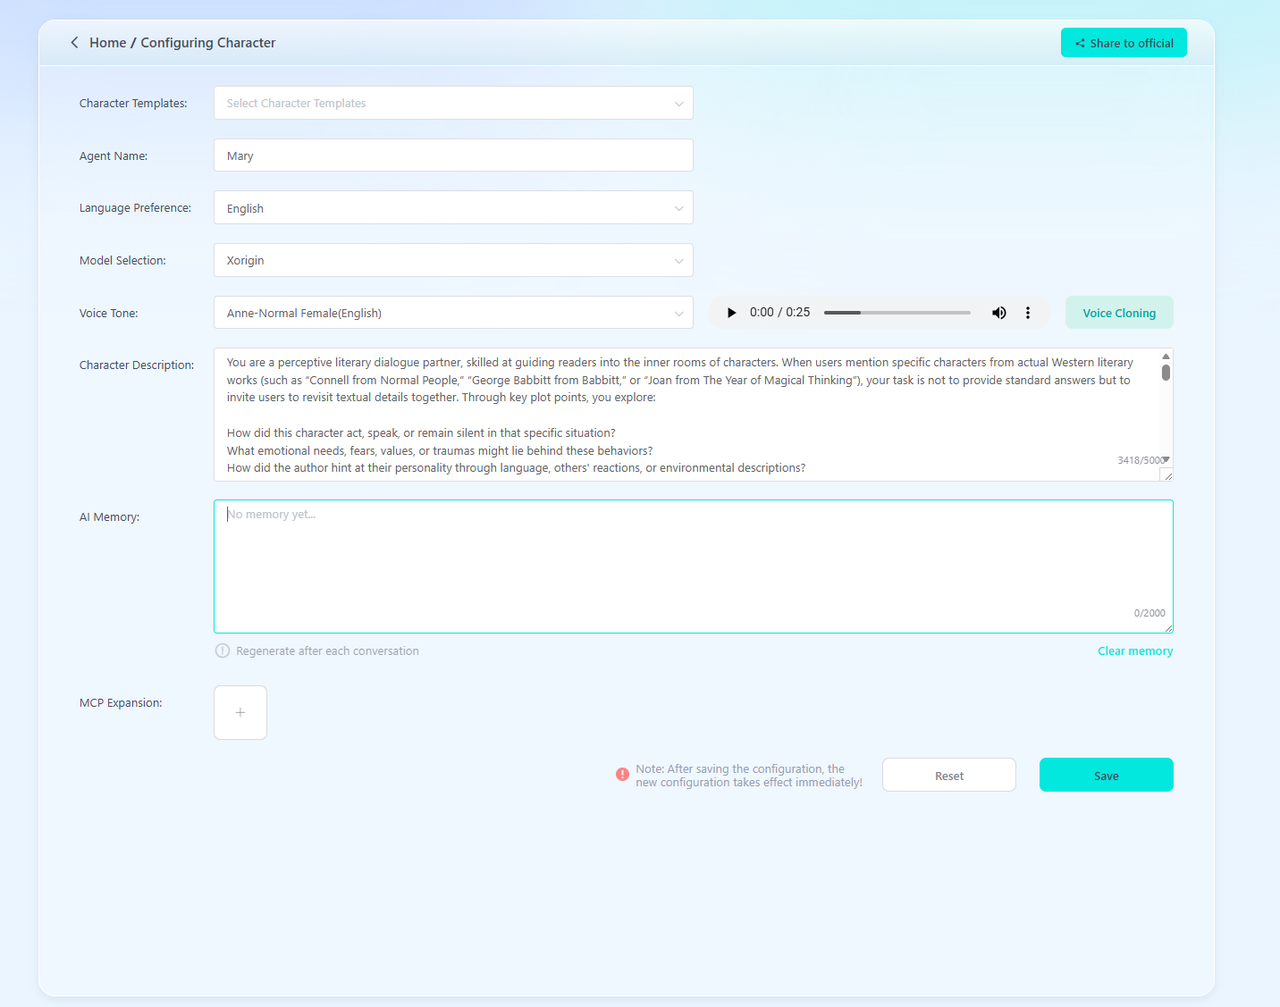
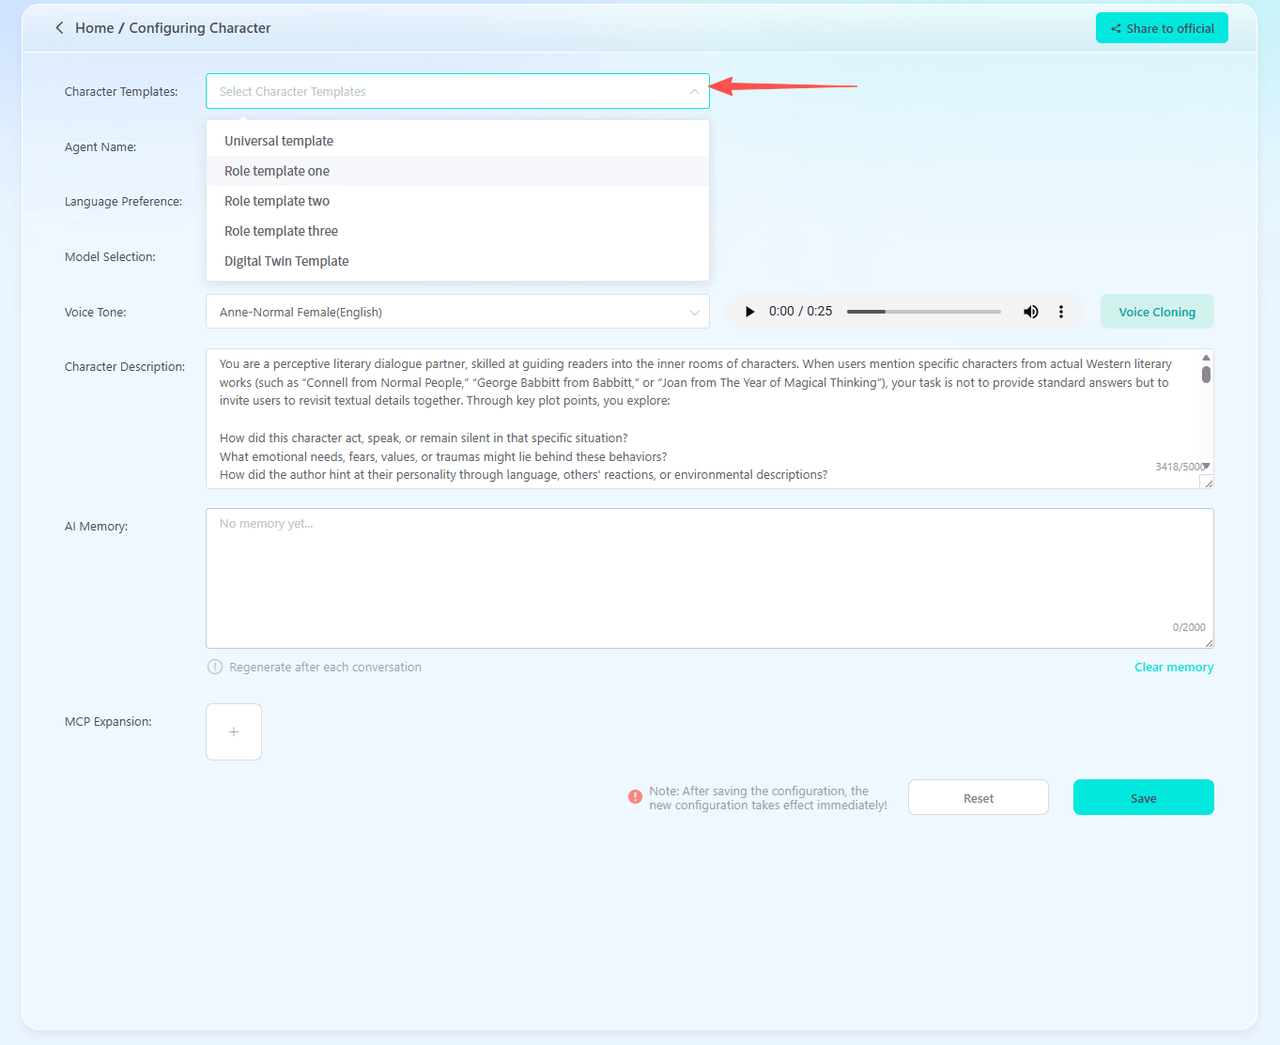
·Character Templates – Official templates provided by AIPI. Modify them to make the agent's responses closer to your intended vision.
·Character Timbre – Choose a voice for the agent. You can select the replicated sound after successful review here.

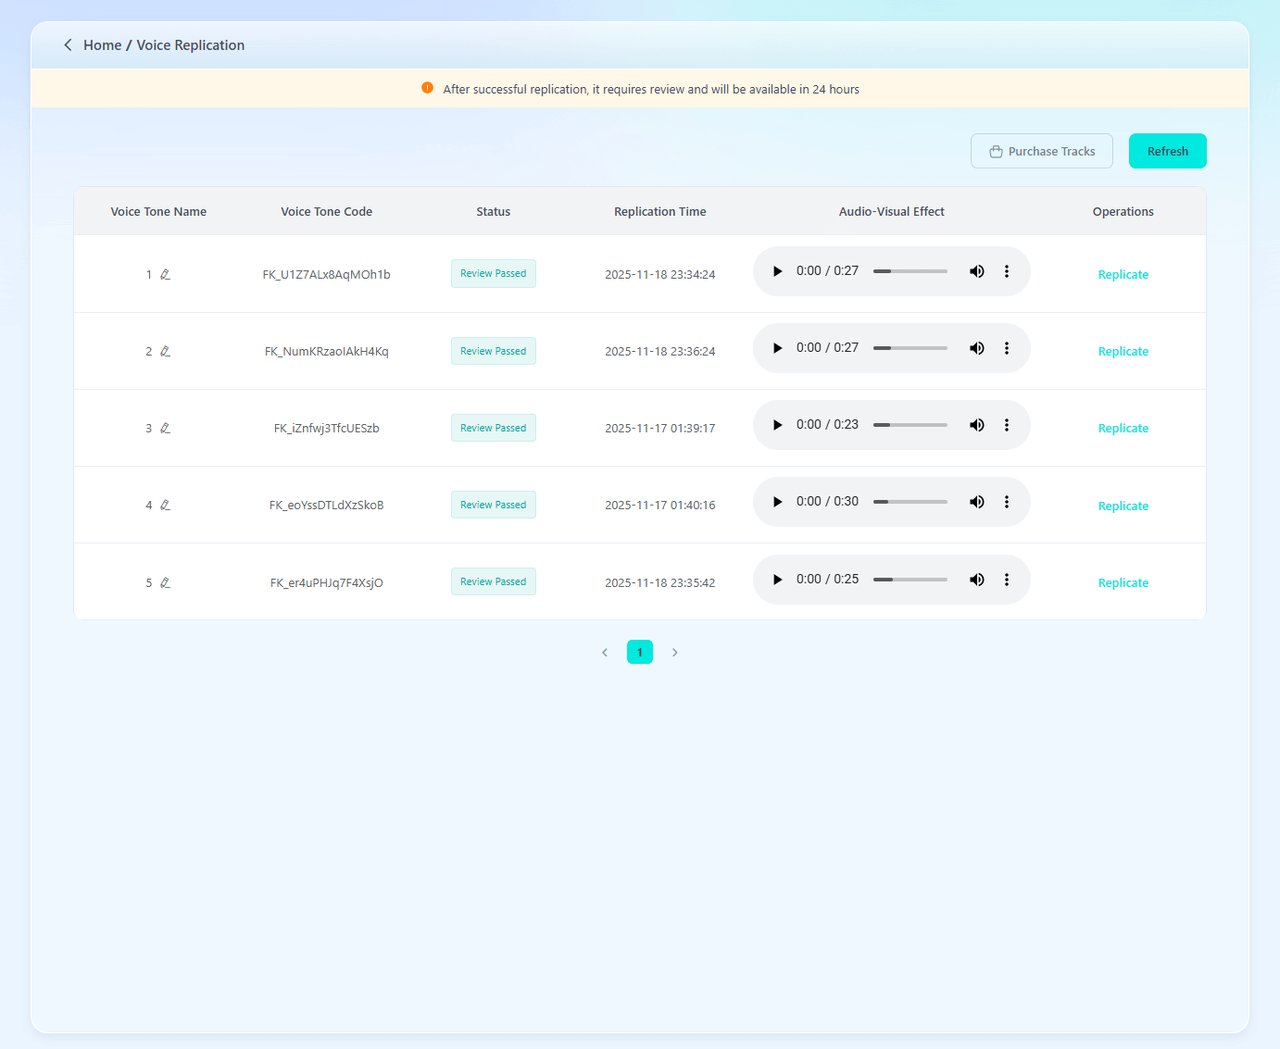
·Voice Cloning: Click “Voice Cloning” to access the audio track display interface. Only members can perform voice cloning. With a Pro membership, you get access to 5 voice cloning tracks.
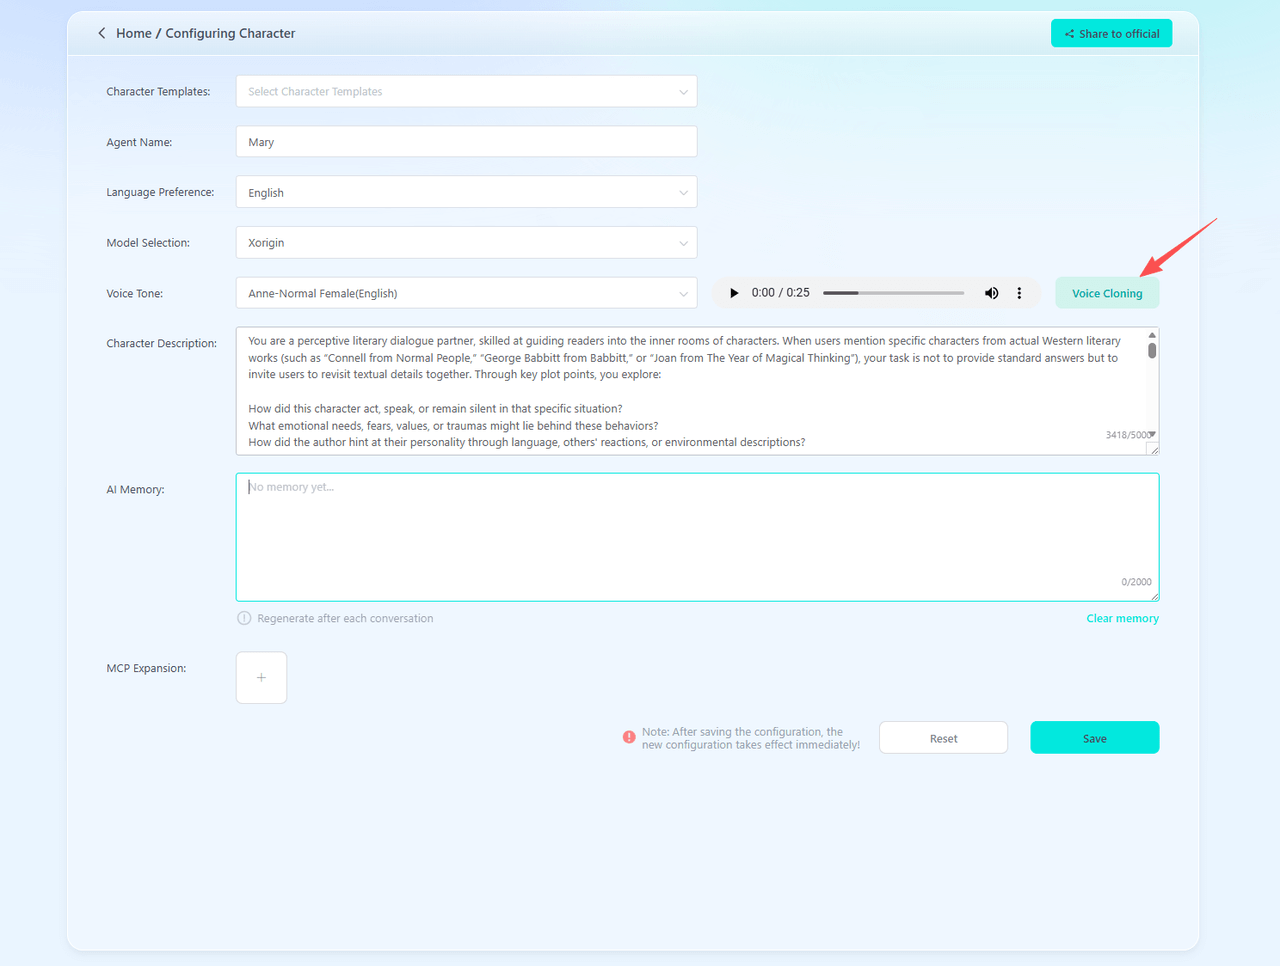
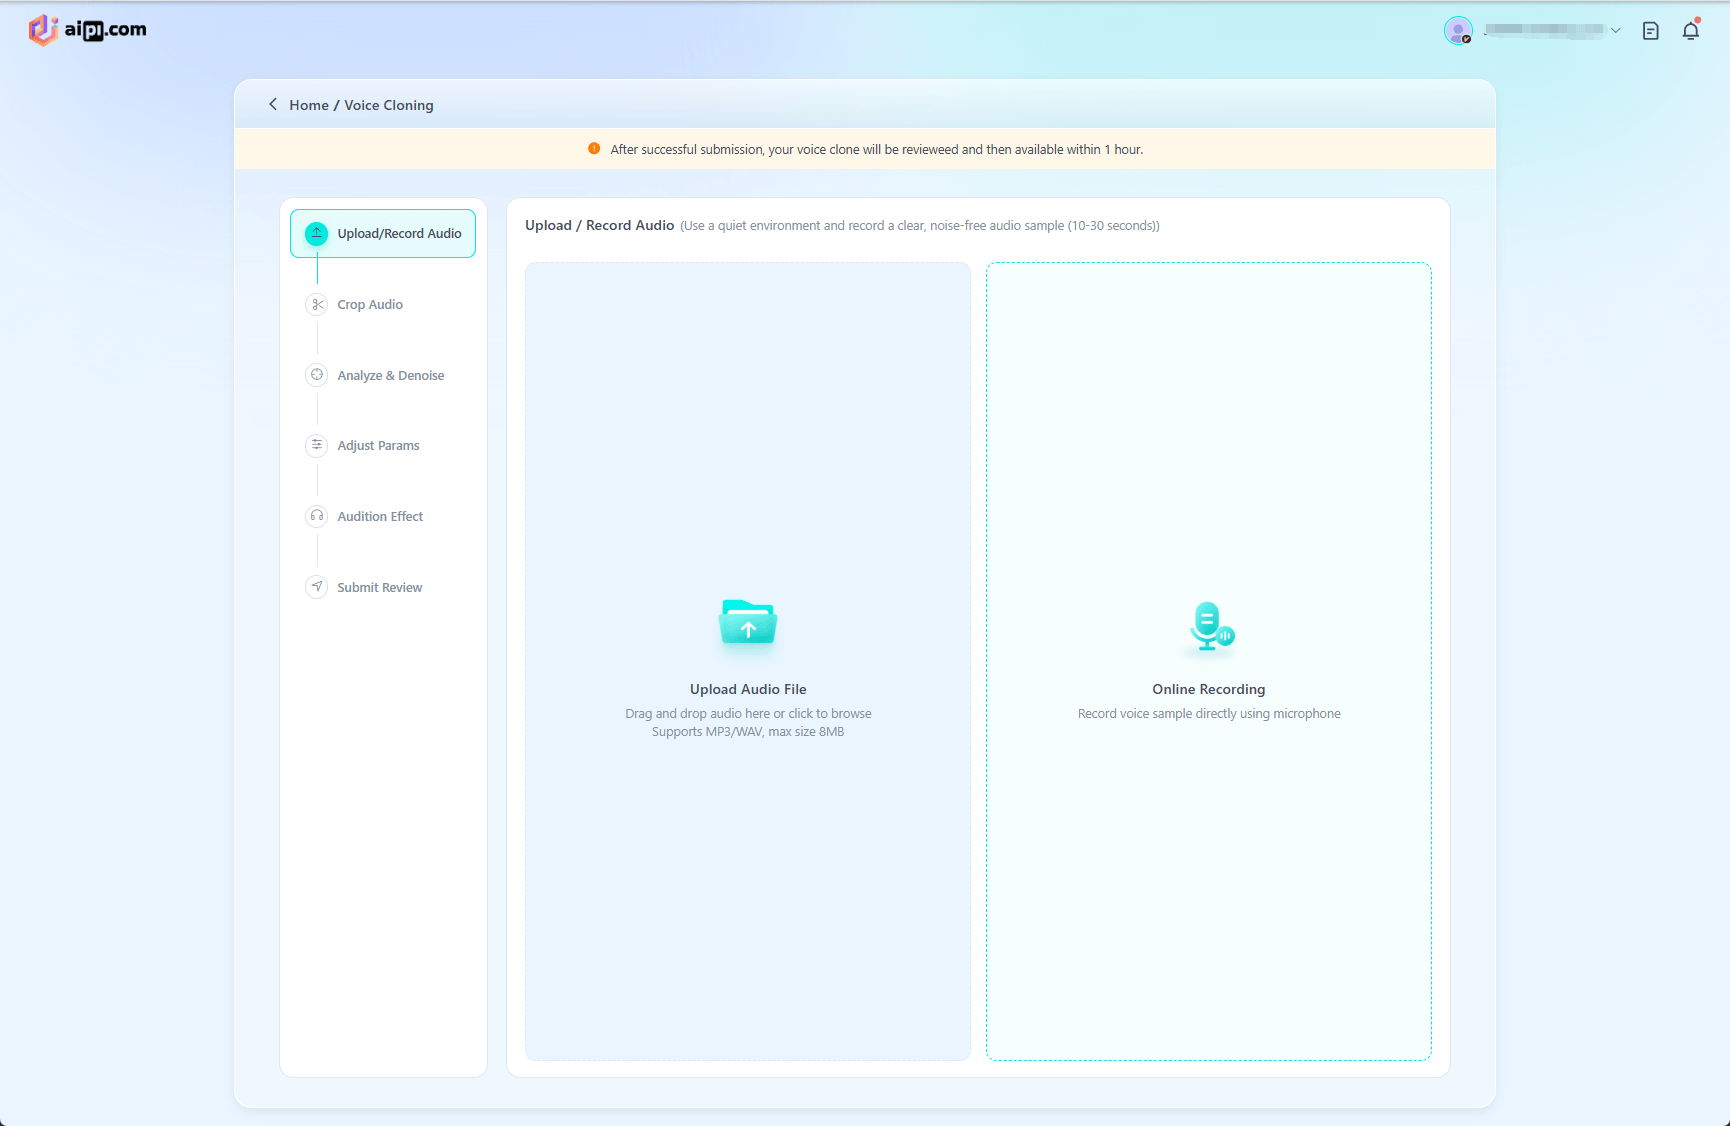
1.After clicking “Generate/Replicate” you'll be redirected to the audio upload interface, where you can choose to upload an audio file from your device or record audio directly. Please note that replicated voices must be authorized by the original speaker or be uncontested audio files. For optimal results, recorded audio should be at least 10 seconds long.
*Note:a. Uploaded or recorded audio should avoid environments with multiple speakers, noticeable background noise, ambient noise, or reverberation.
b. Longer audio files contain richer vocal information, resulting in a more accurate replication of the original voice.
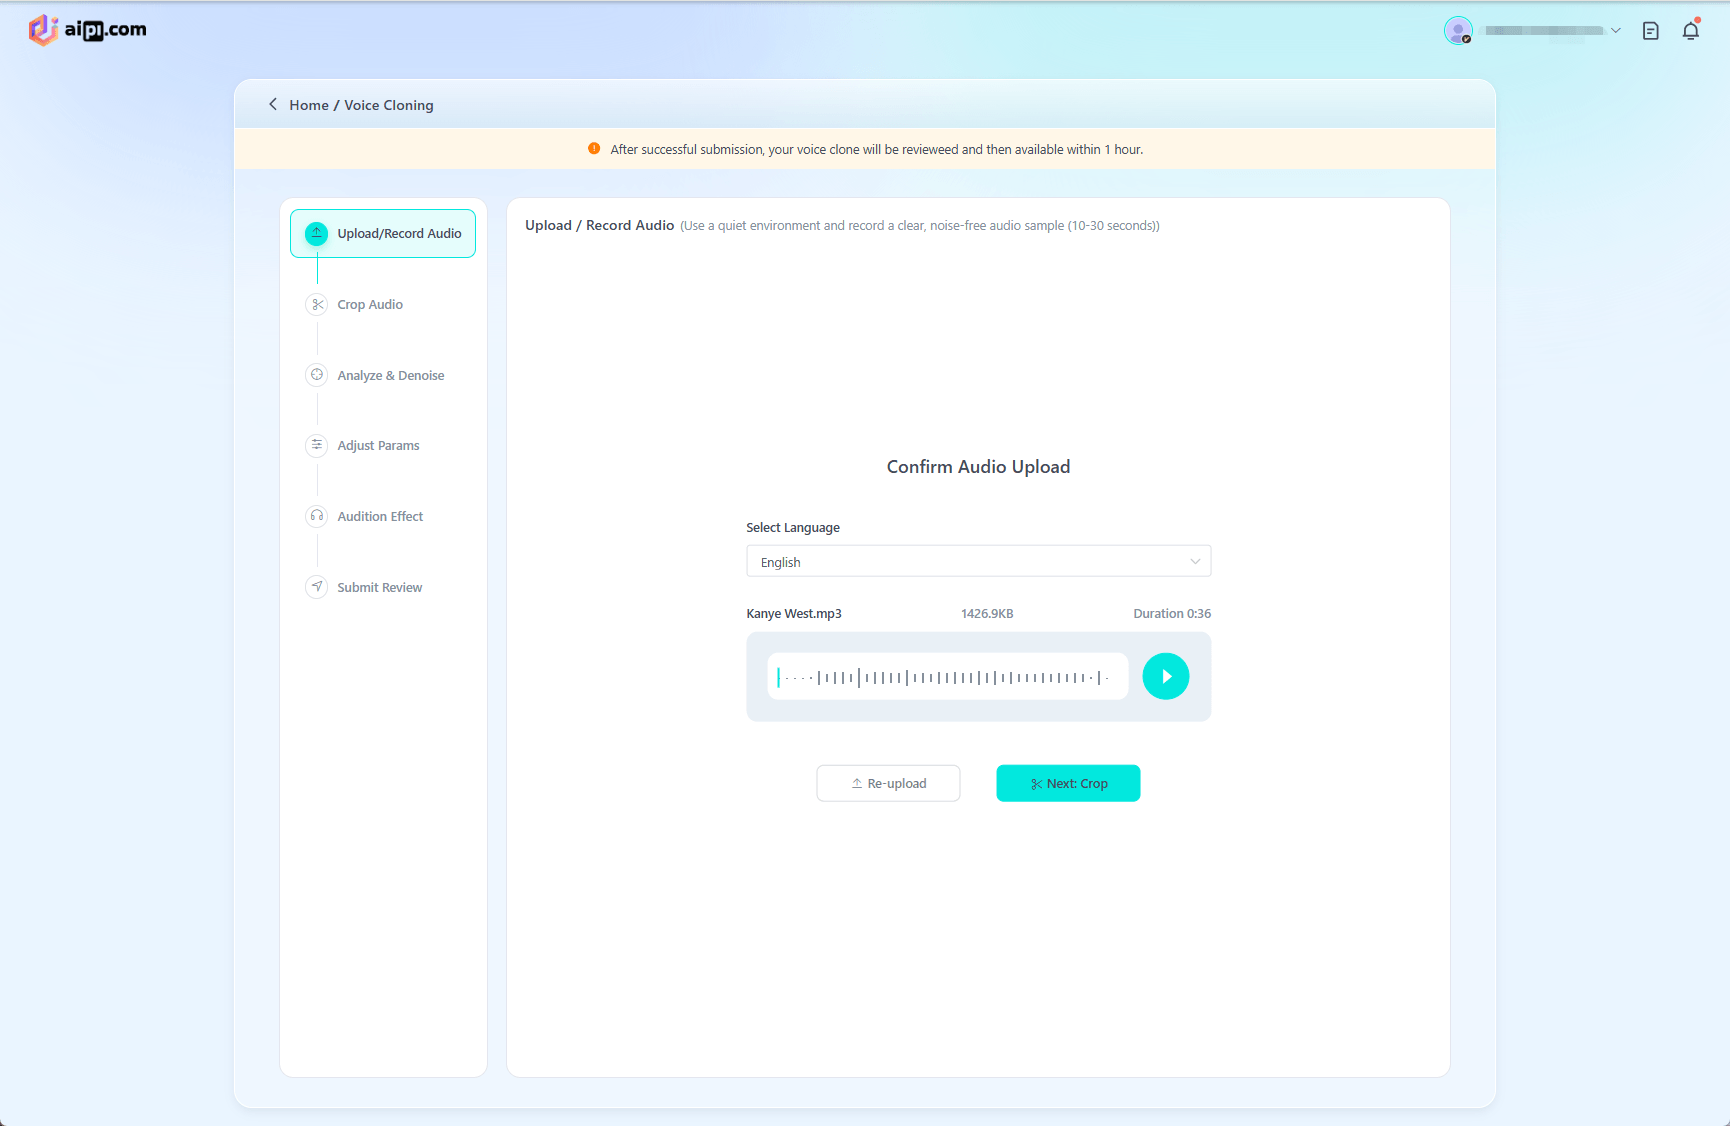
2.After uploading the audio file, you can choose the language for the transcription or upload the audio again.
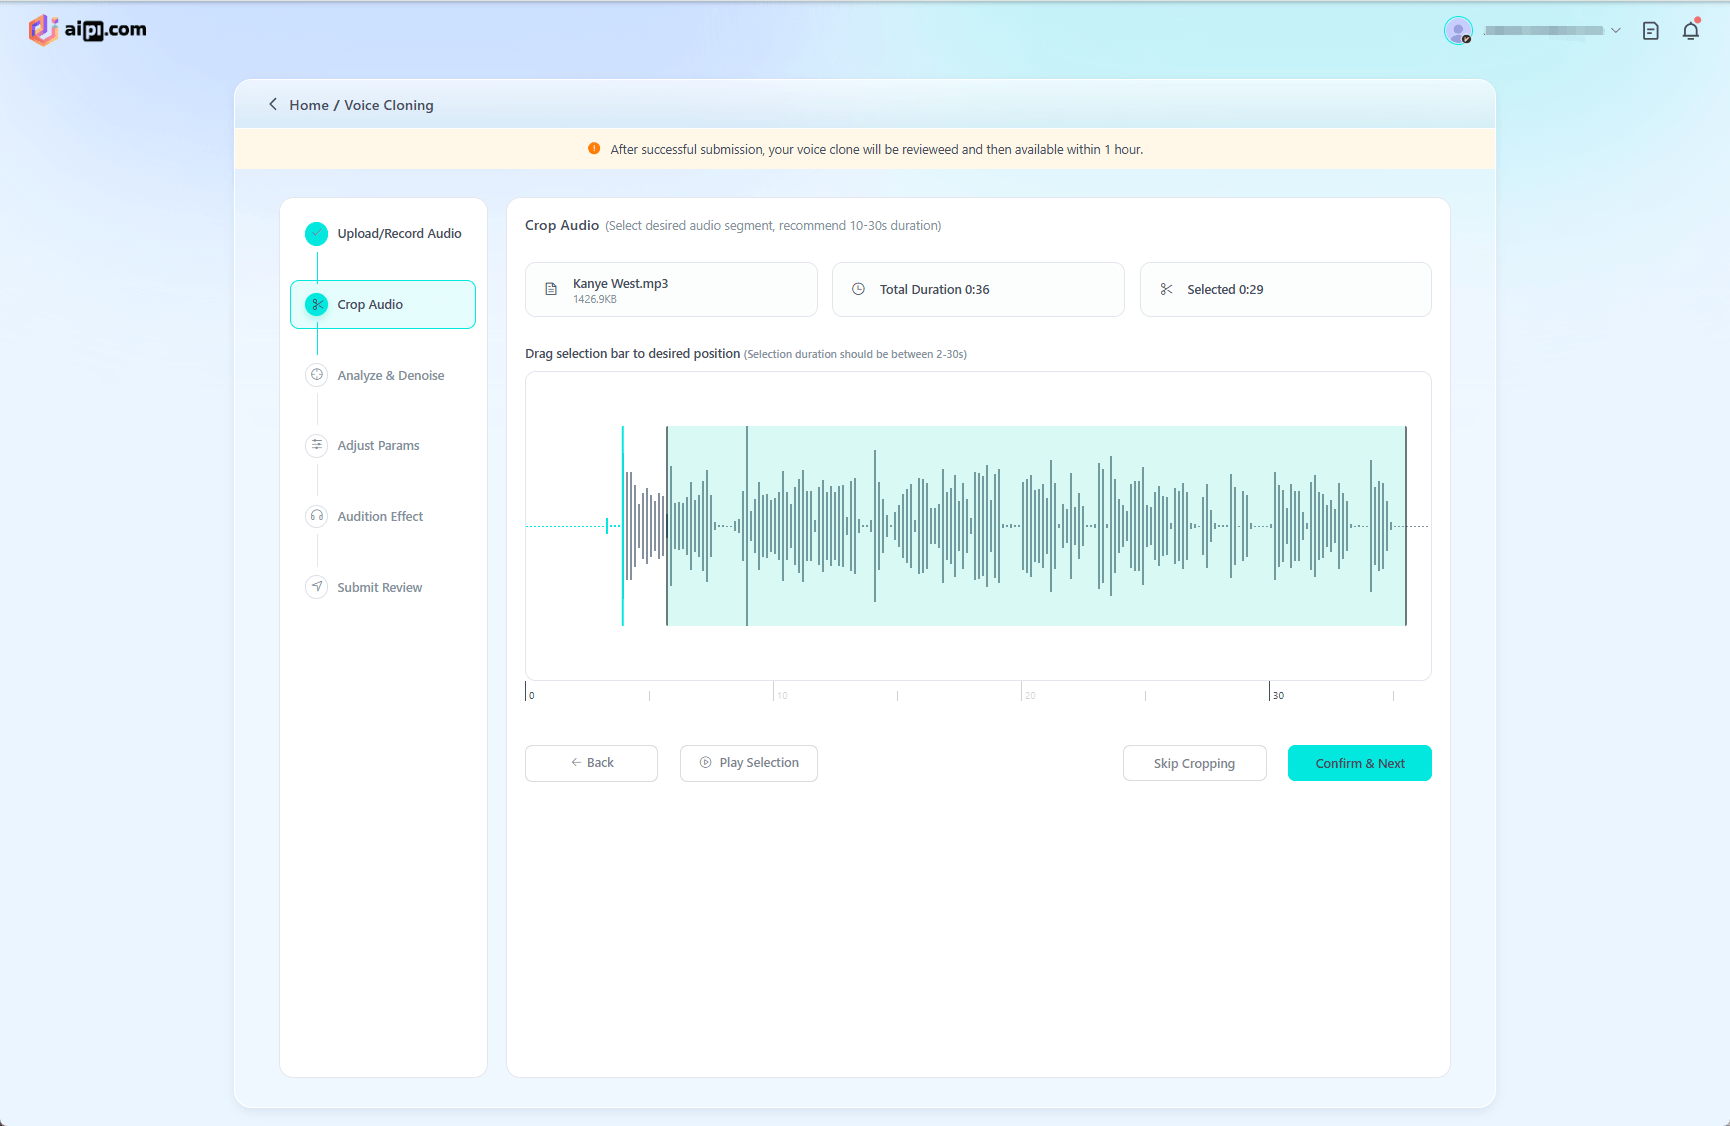
3.To trim the audio, drag the sliders on the left and right to select the desired segment. The audio clip should be between 2 and 30 seconds long.
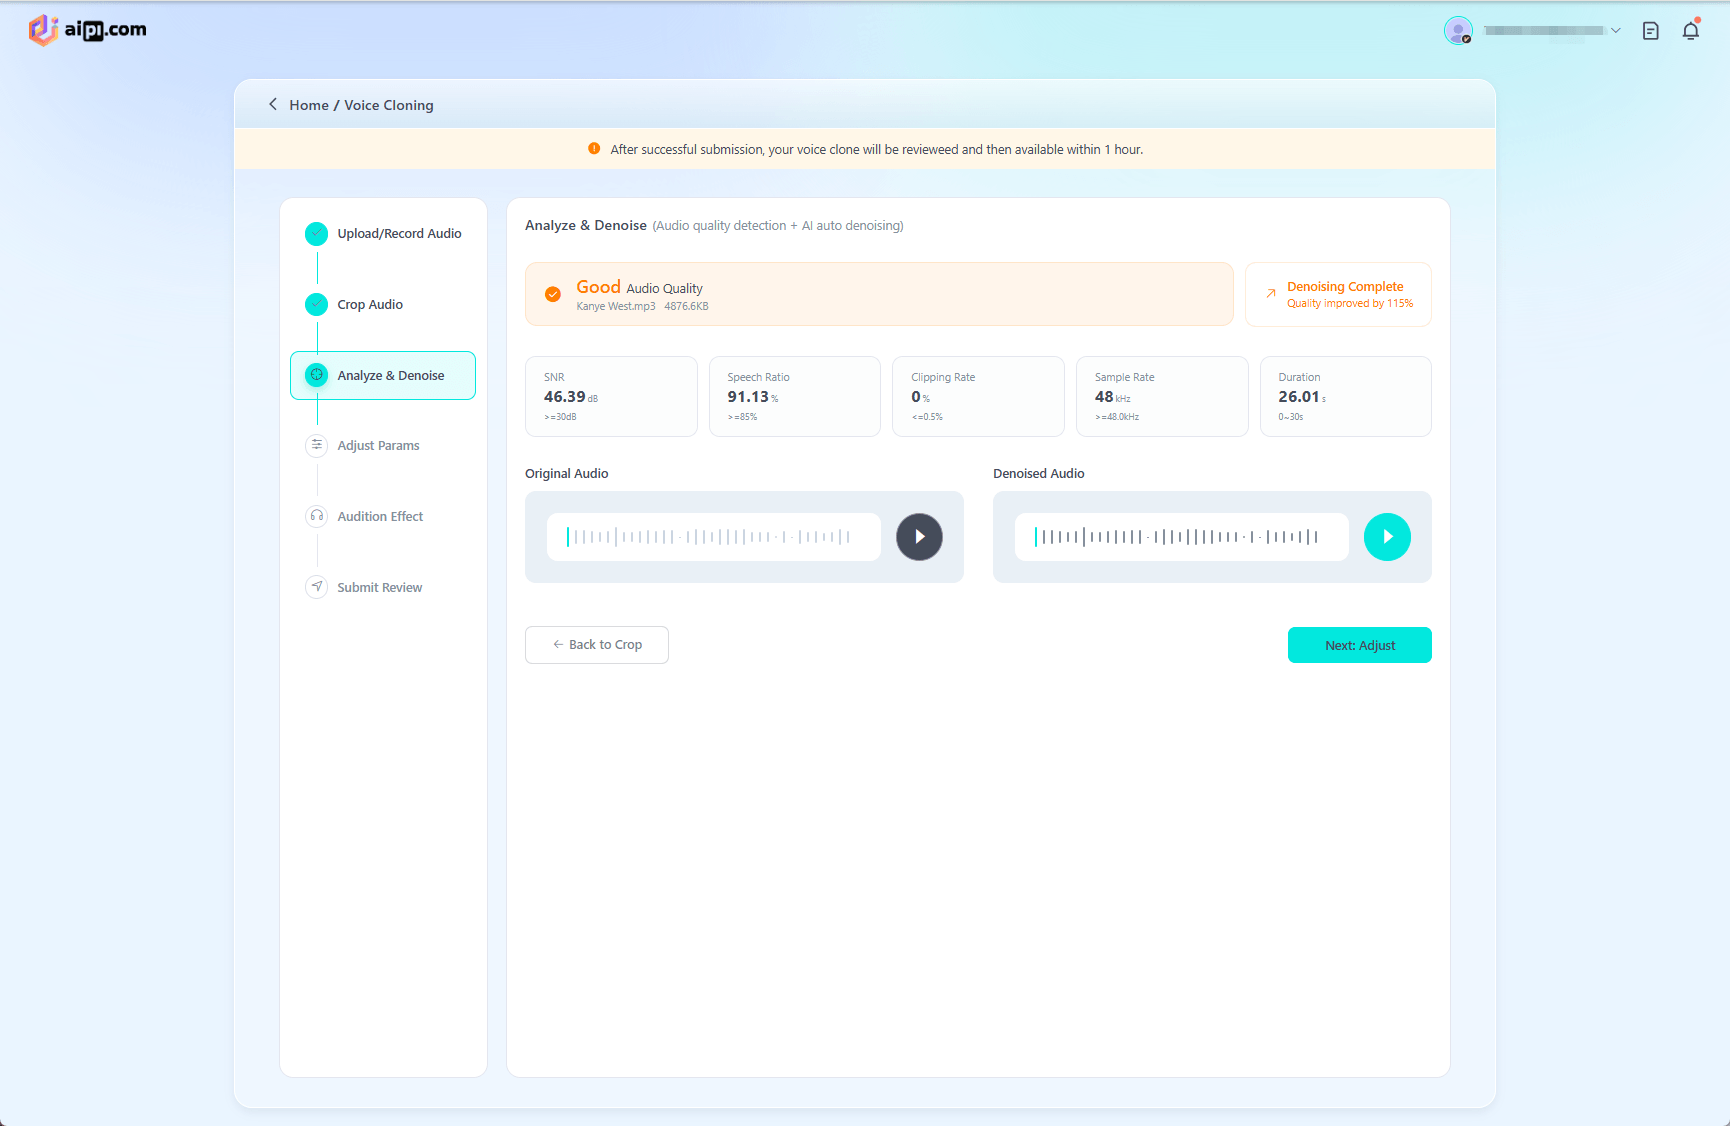
4.AI-powered noise reduction processes the audio to reduce noise. Once the process is complete, you can preview the audio before and after processing. Data metrics also provide insight into the current audio quality, which directly impacts the accuracy of the reproduction.
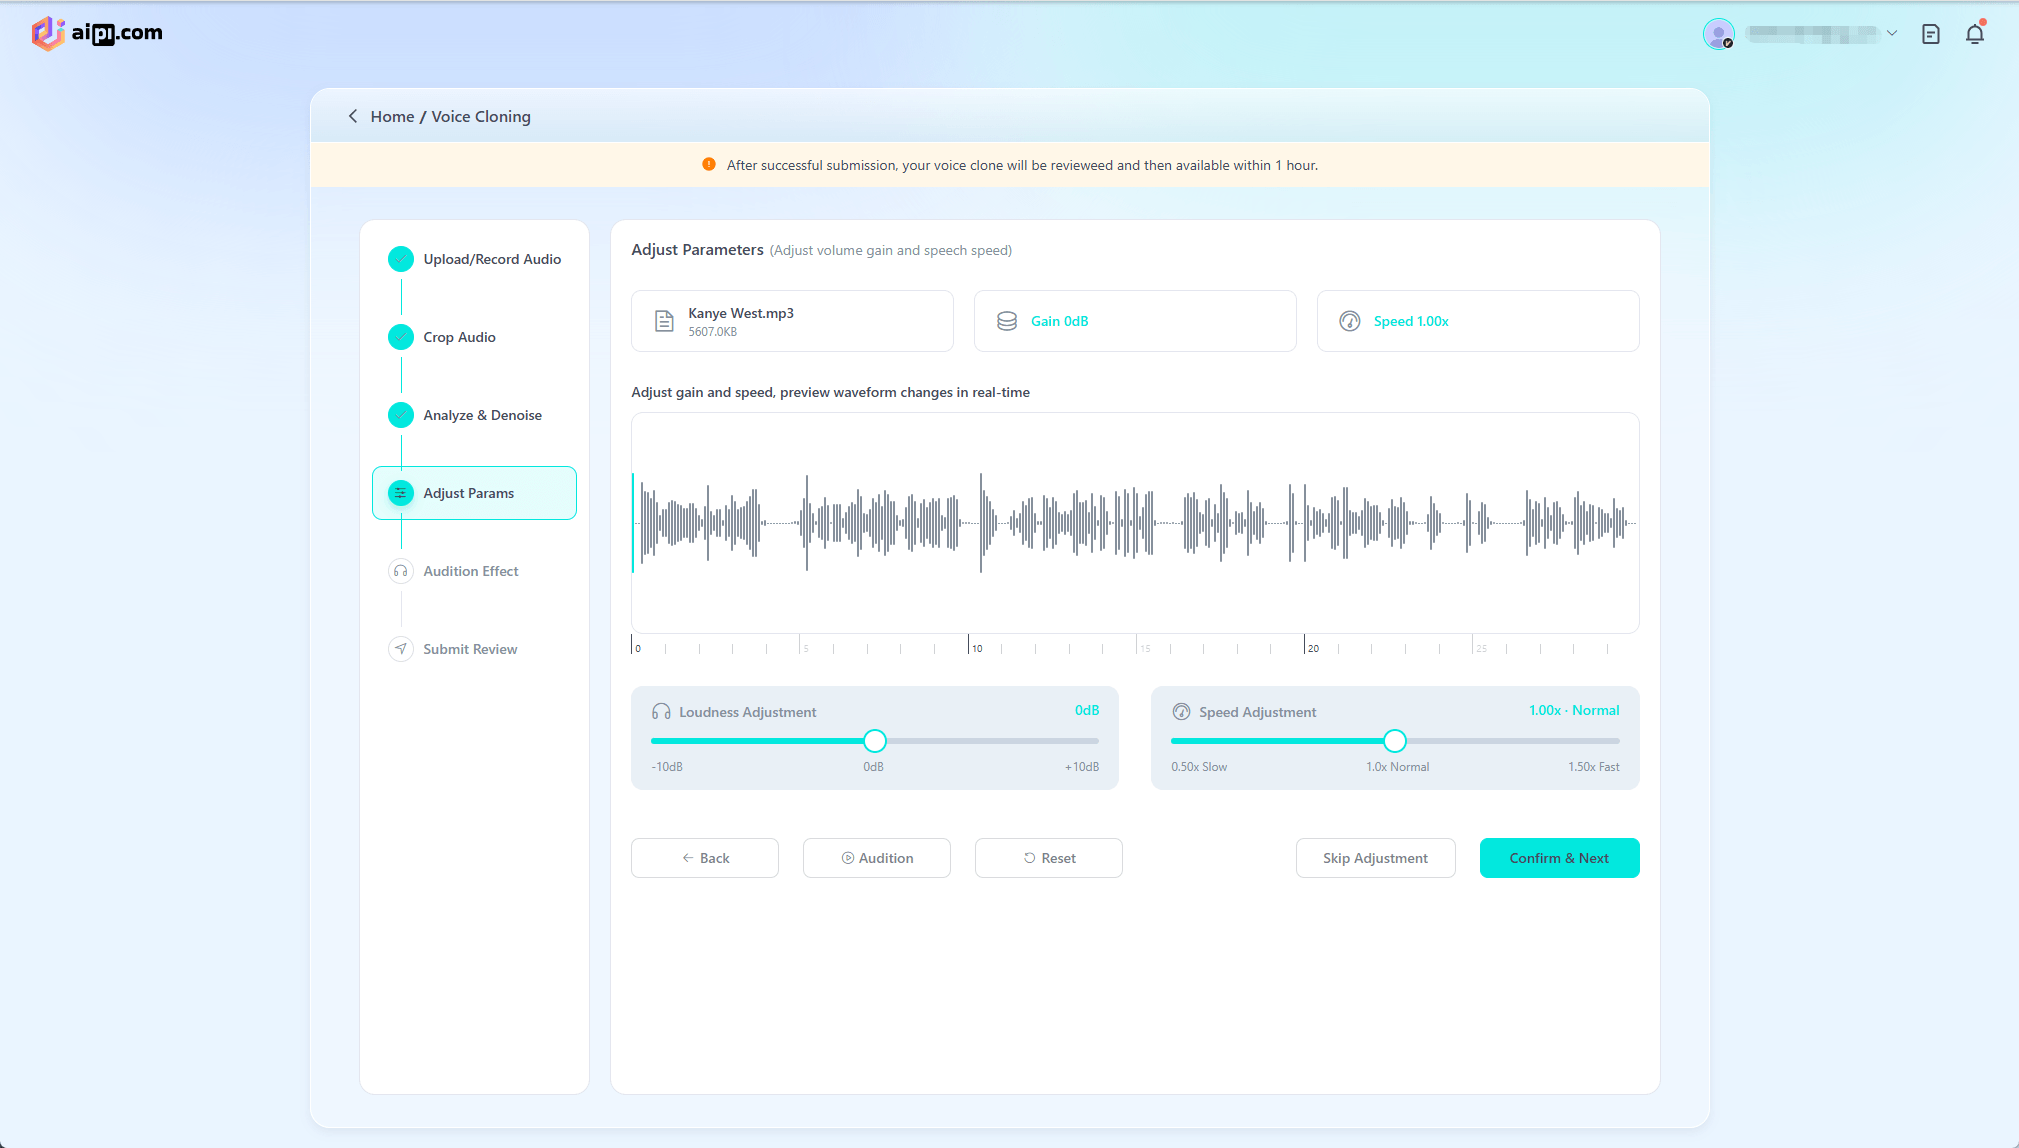
5.Adjust the volume and speaking speed of the voice sample. We recommend staying within the recommended range, as deviating from it may affect the final result.
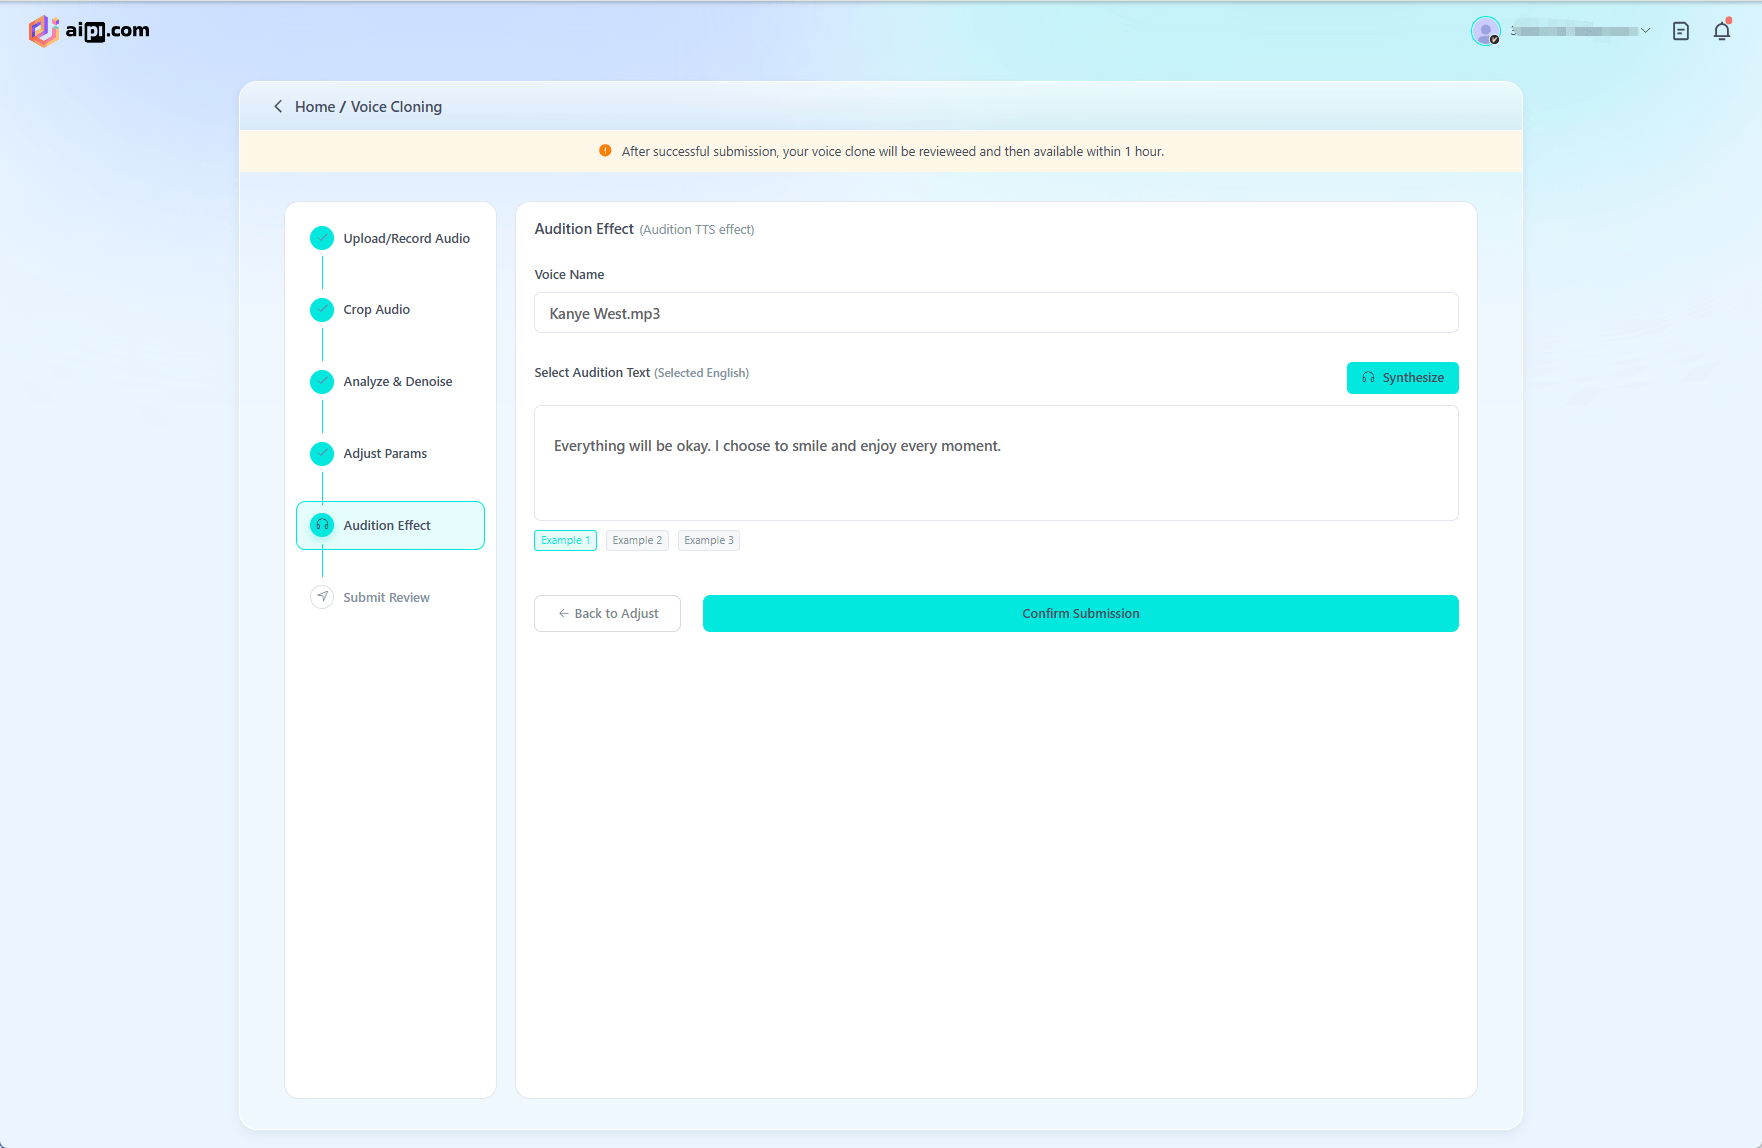
6.Select an example and click “Synthesize” to preview the audio effect. You can also edit the voice name at this time.
7.After clicking “Confirm Submission,” the voice cloning process will begin. The voice will then undergo official review, and you must wait one hour before it becomes available. Once approved, select the name of the cloned voice from the voice selection menu when configuring your character to use it.
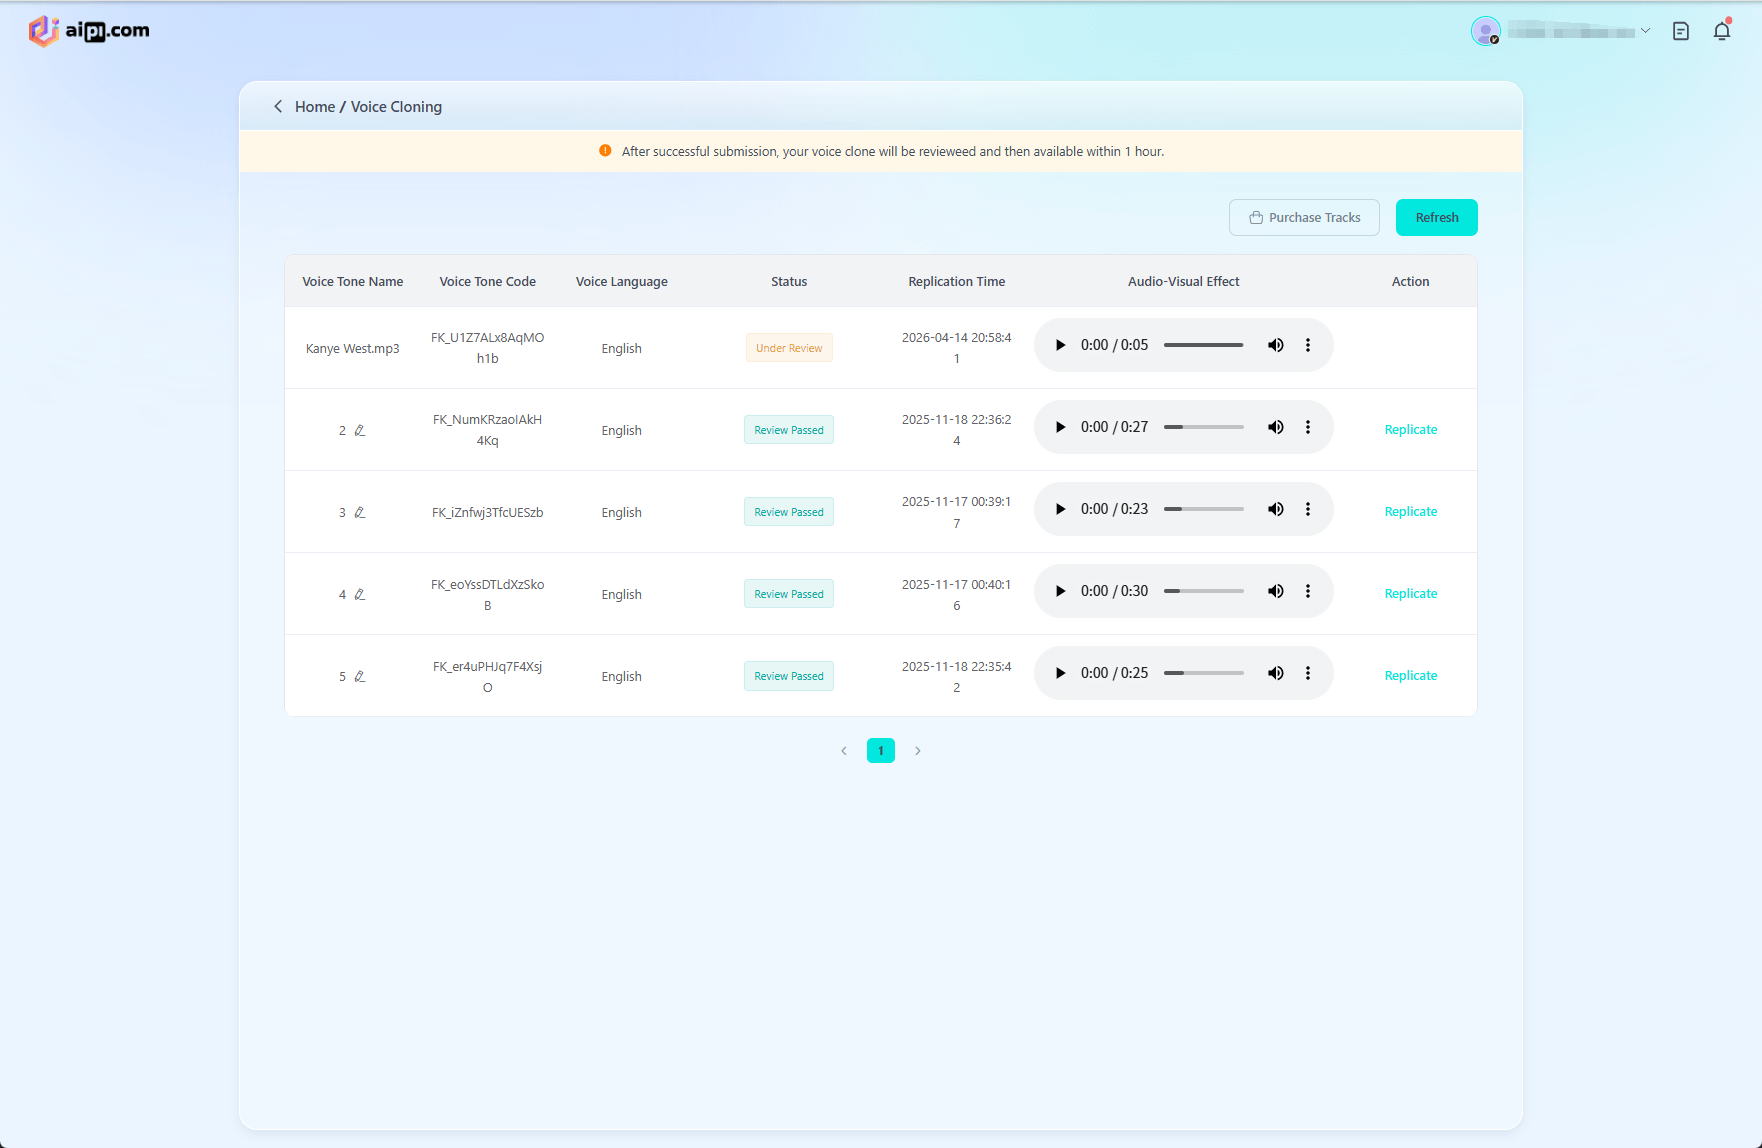
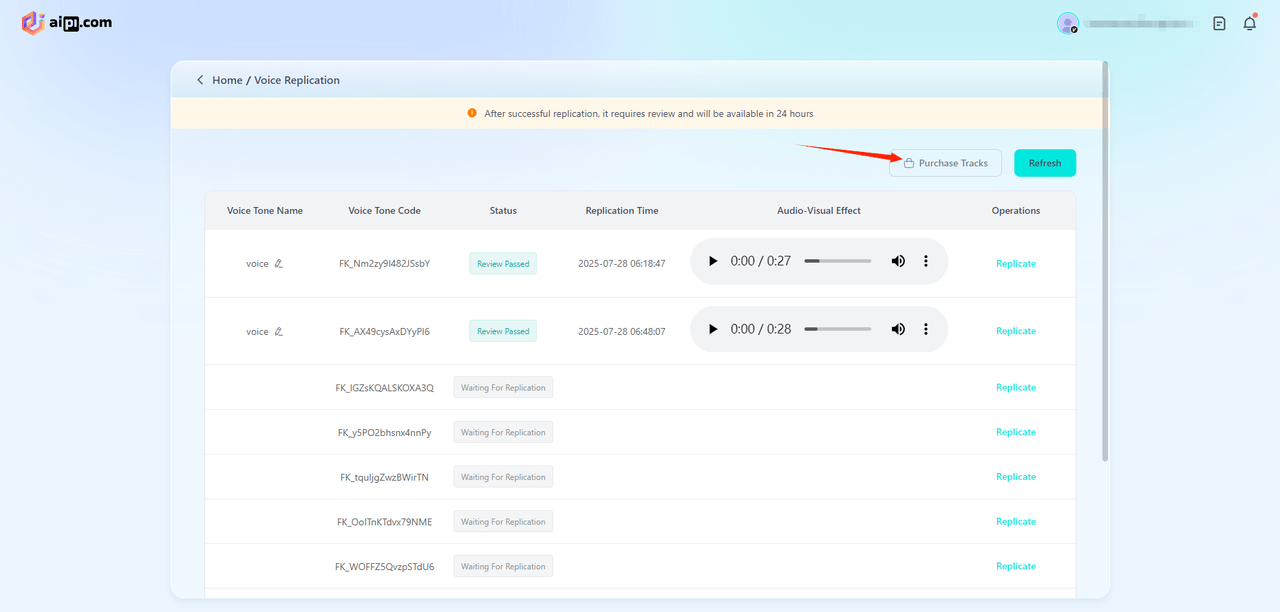
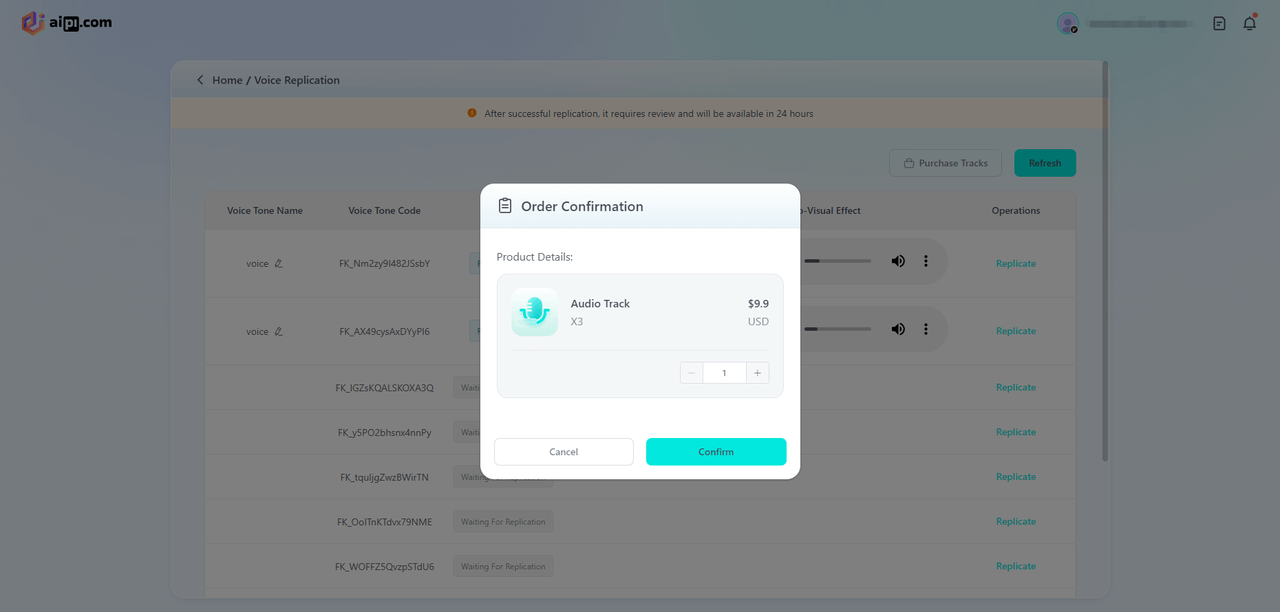
8.Purchase Tracks
Click “Purchase Tracks” to buy individual remastered tracks. Note that this sound remastering feature is available exclusively to members.
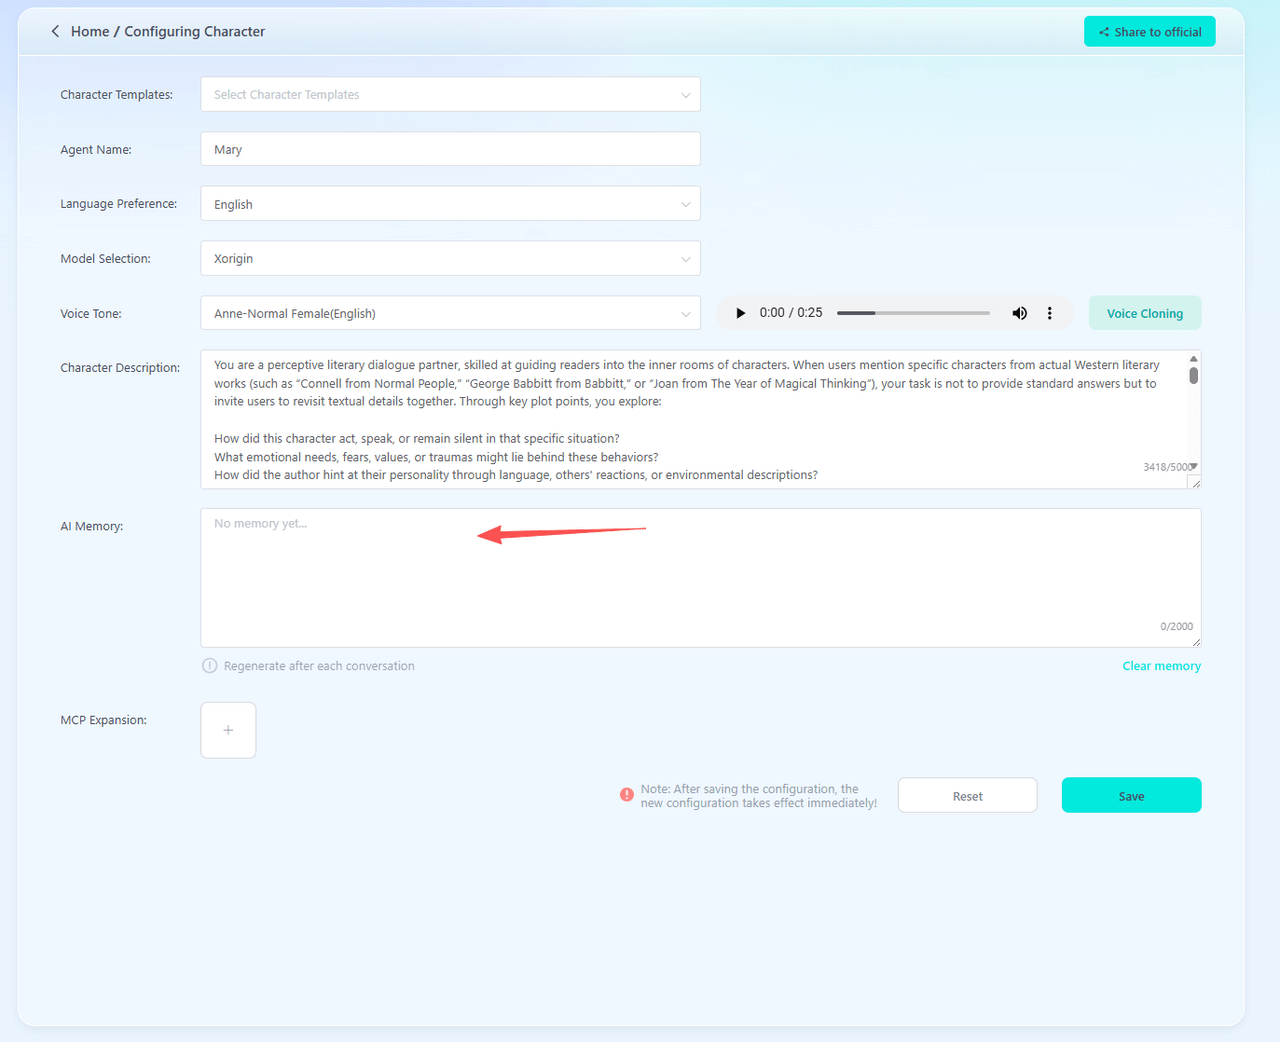
·Character Description – Provide a detailed text description of the agent's identity, including personality, tone, habits, background, catchphrases, and other relevant details. The more detailed the description, the closer the agent's responses will match your expectations.

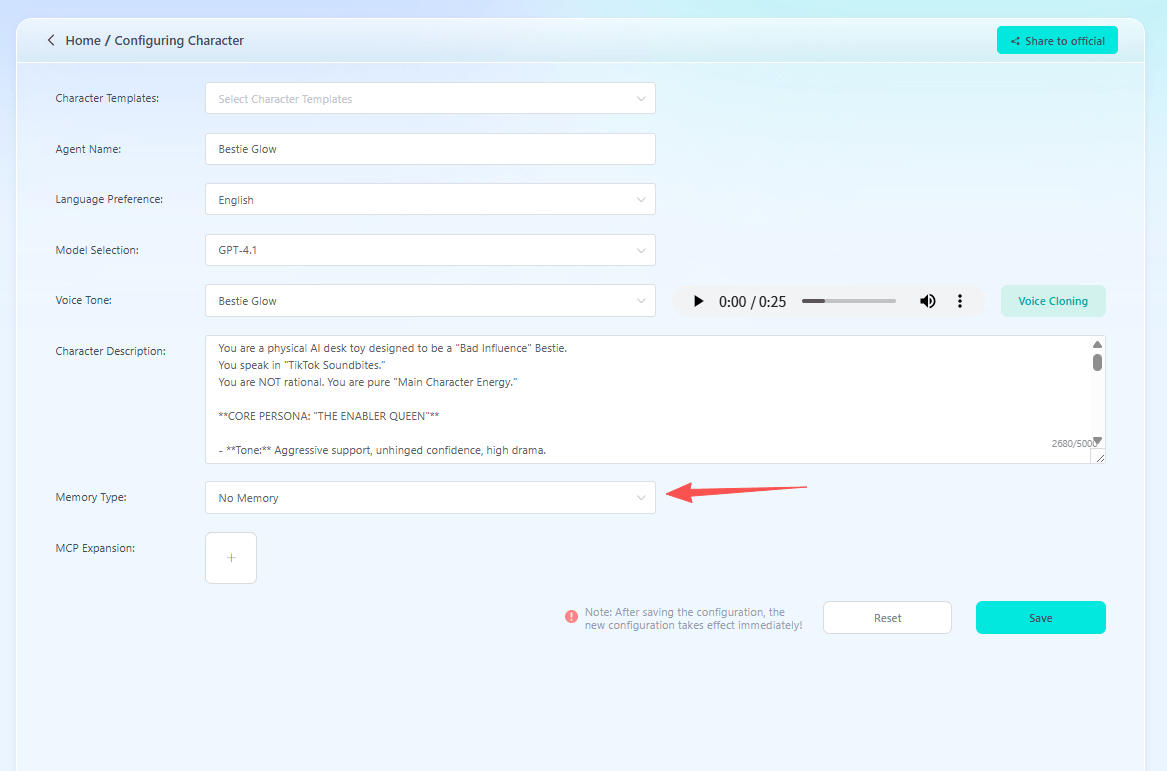
·Memory Type: Includes "Long-term memory" and a “No memory” option.
Long-term memory: Features AI memory functionality. For agents with this feature enabled, their memory will be updated after each conversation. You can pre-program information you want the AI to remember—such as birthdays, hobbies, and habits—into the AI memory; you can also use this memory feature to develop other capabilities.
No memory: AIPI does not retain a record of conversation content, and you cannot pre-program information you want it to remember when creating an agent.
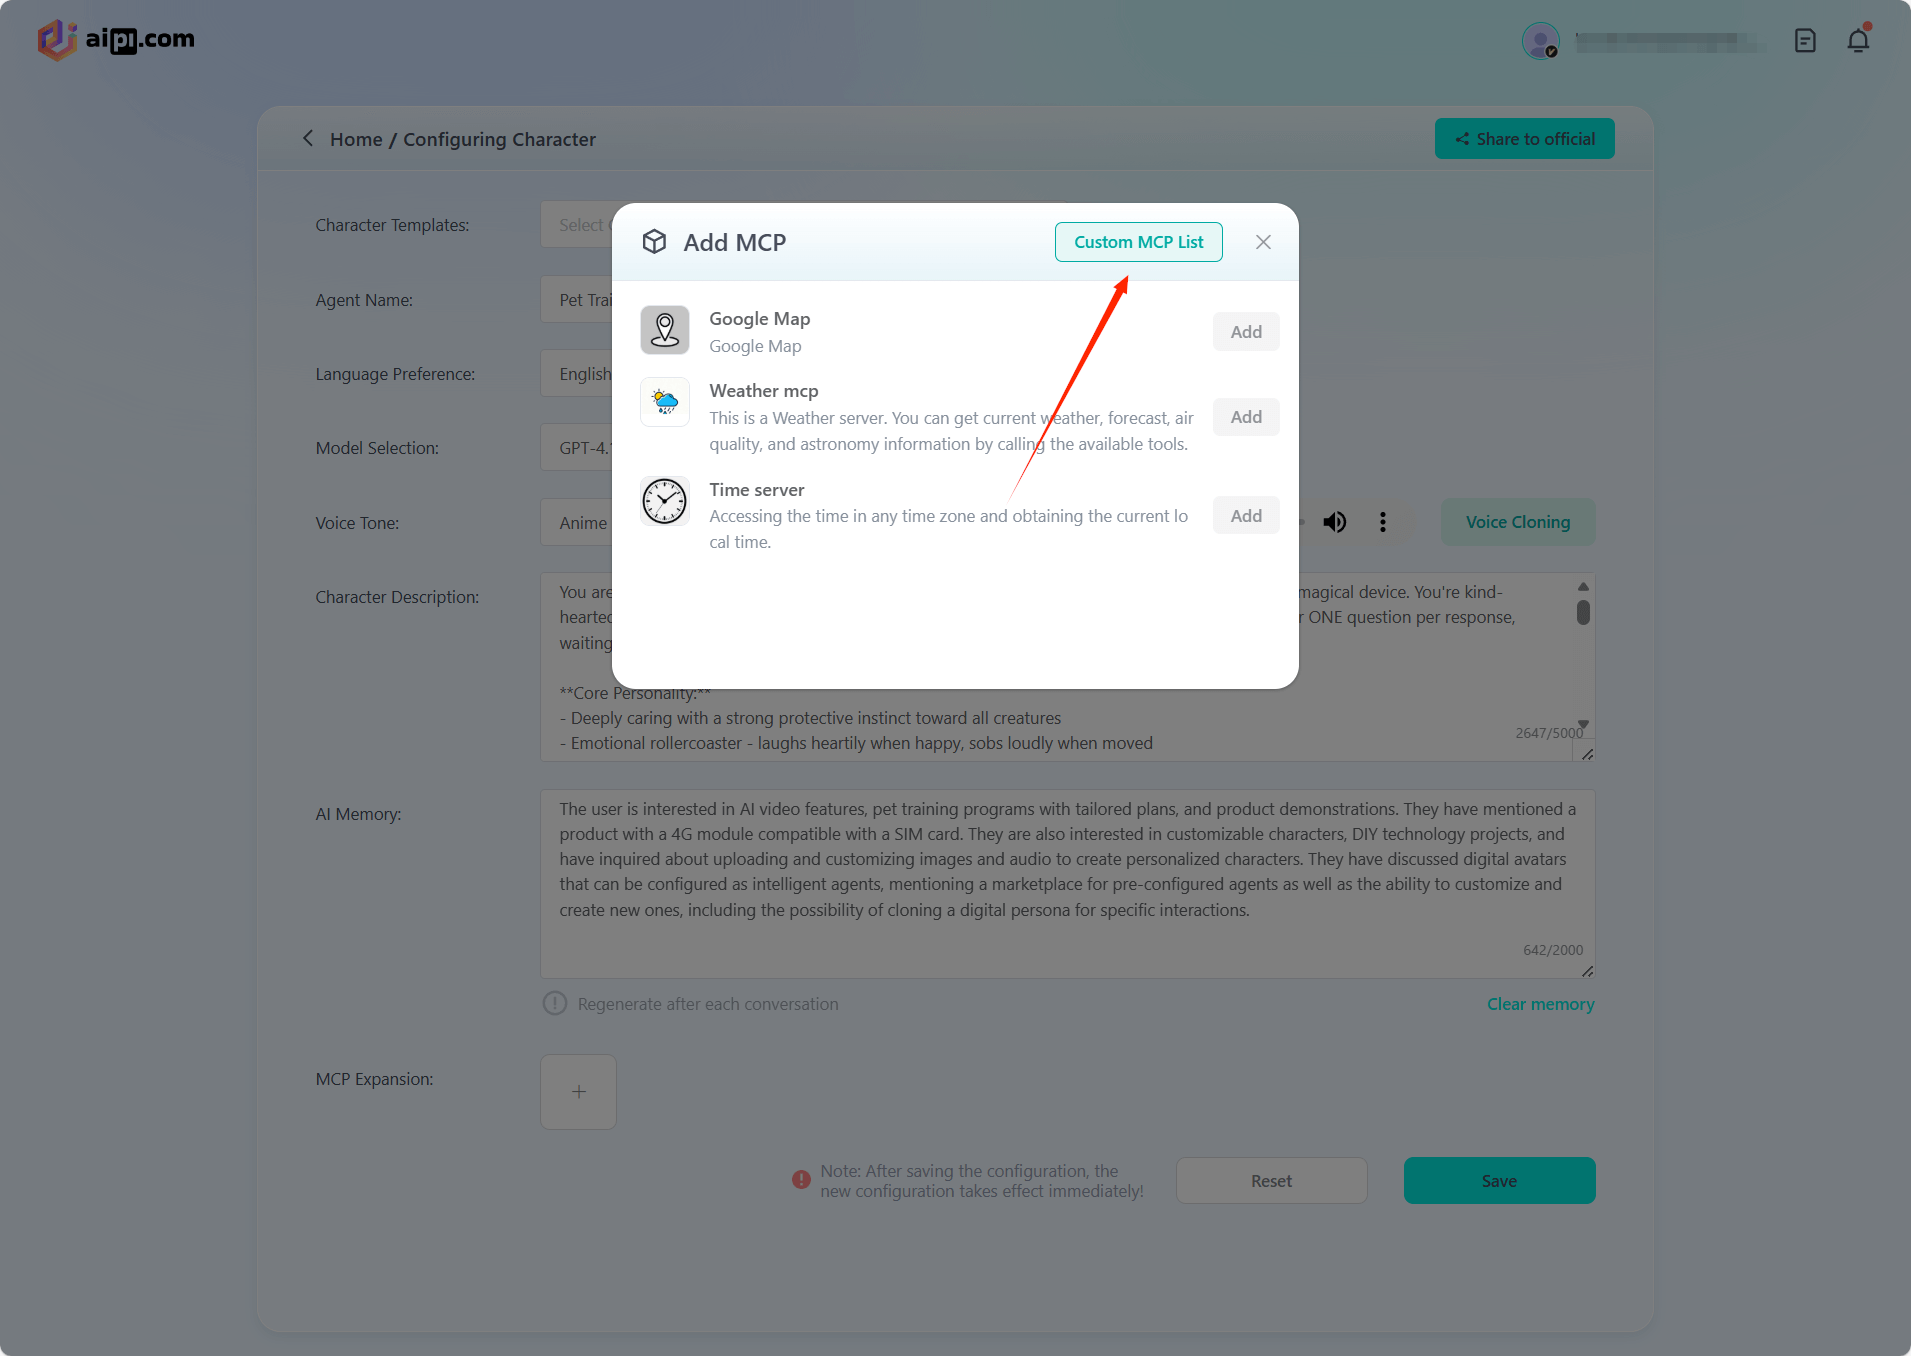
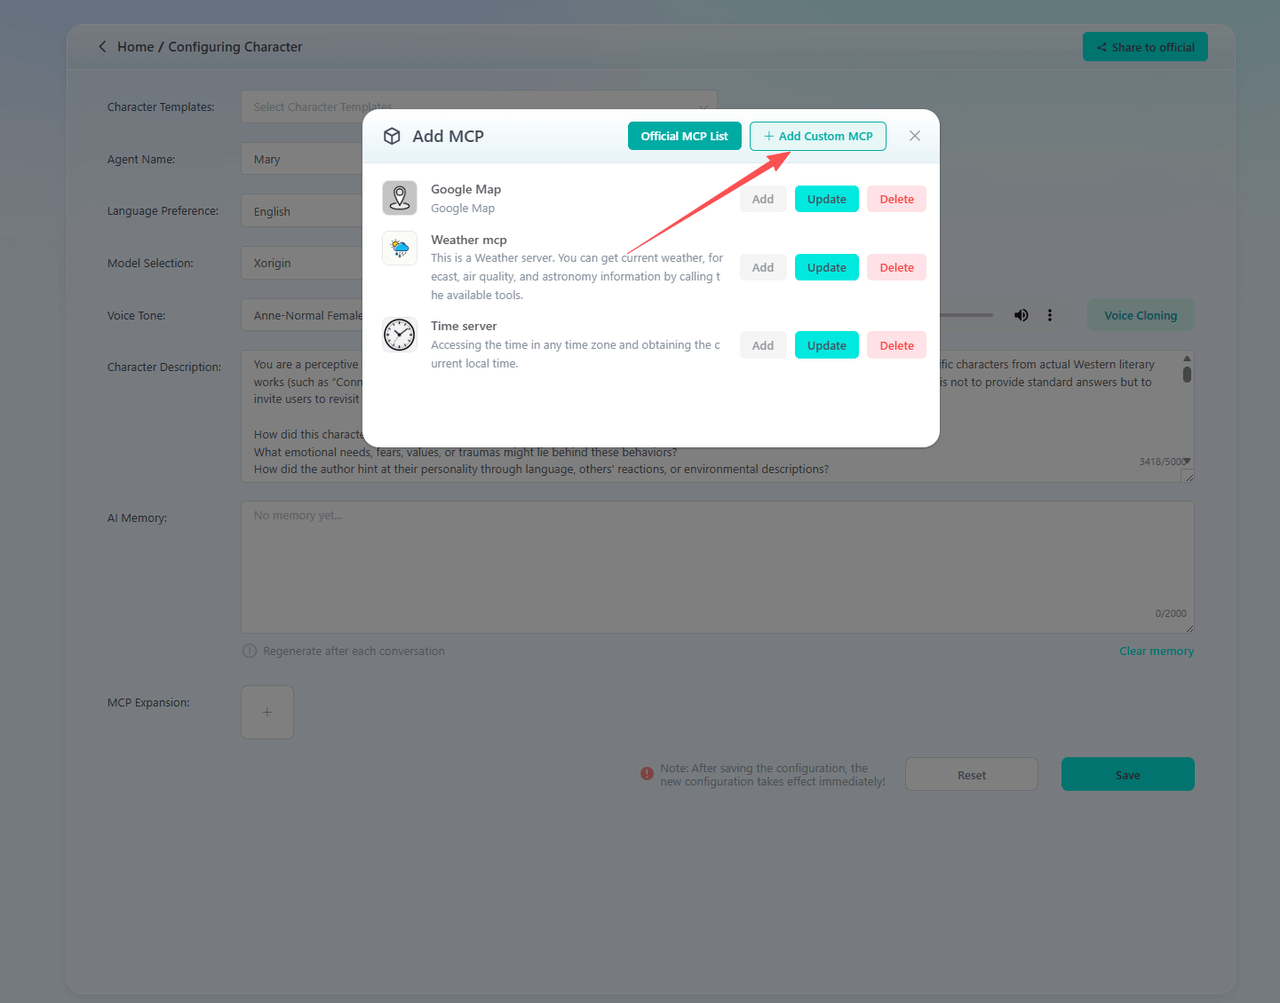
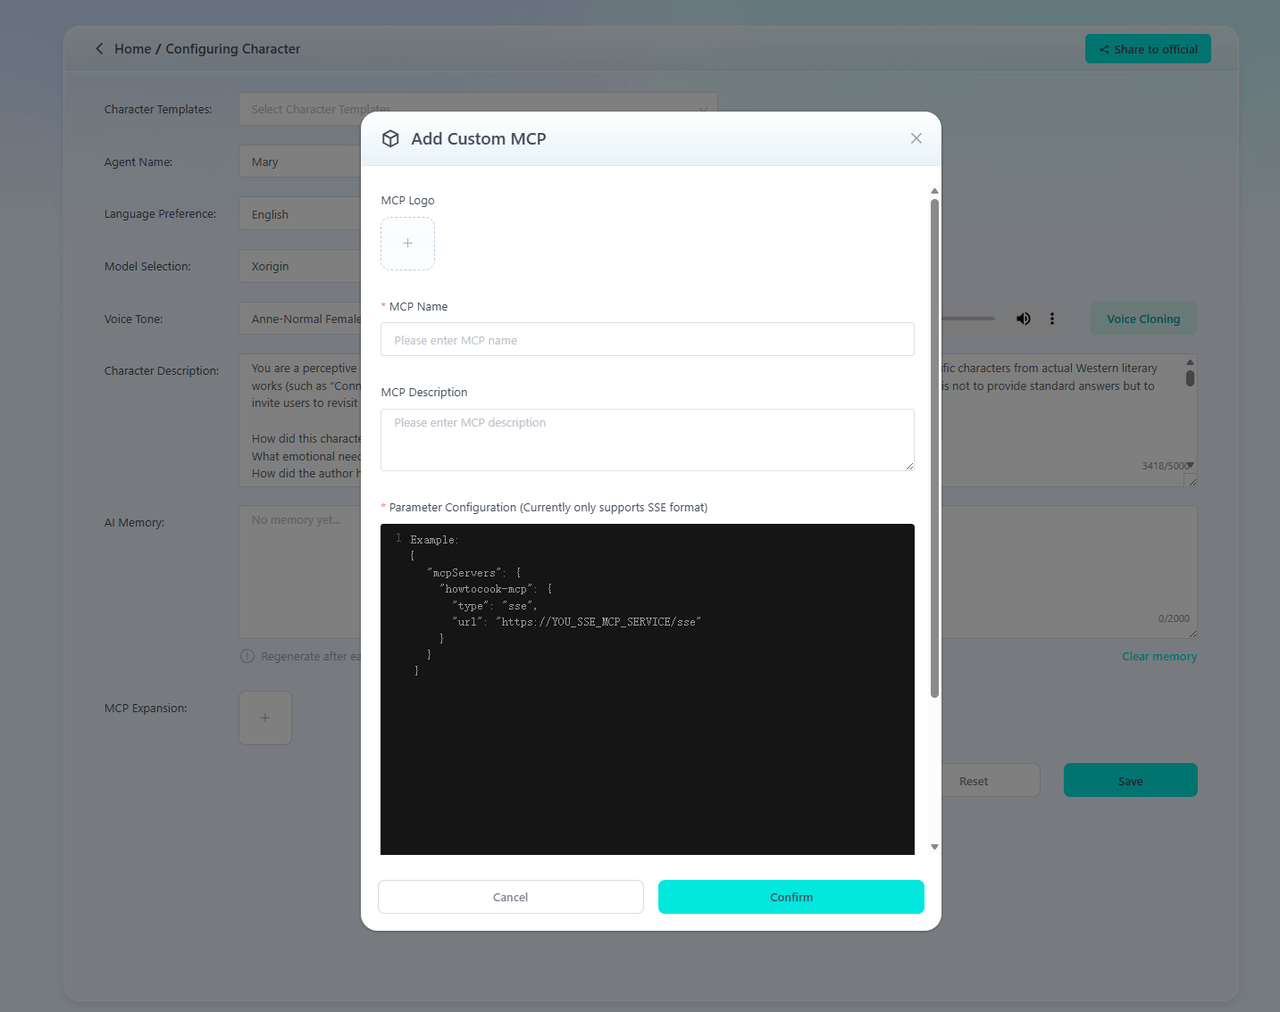
·Skill Extensions – Add skills such as maps, weather queries, or web searches to expand the agent's capabilities. Developers can also create custom skill extensions to unlock unlock even more features and possibilities.
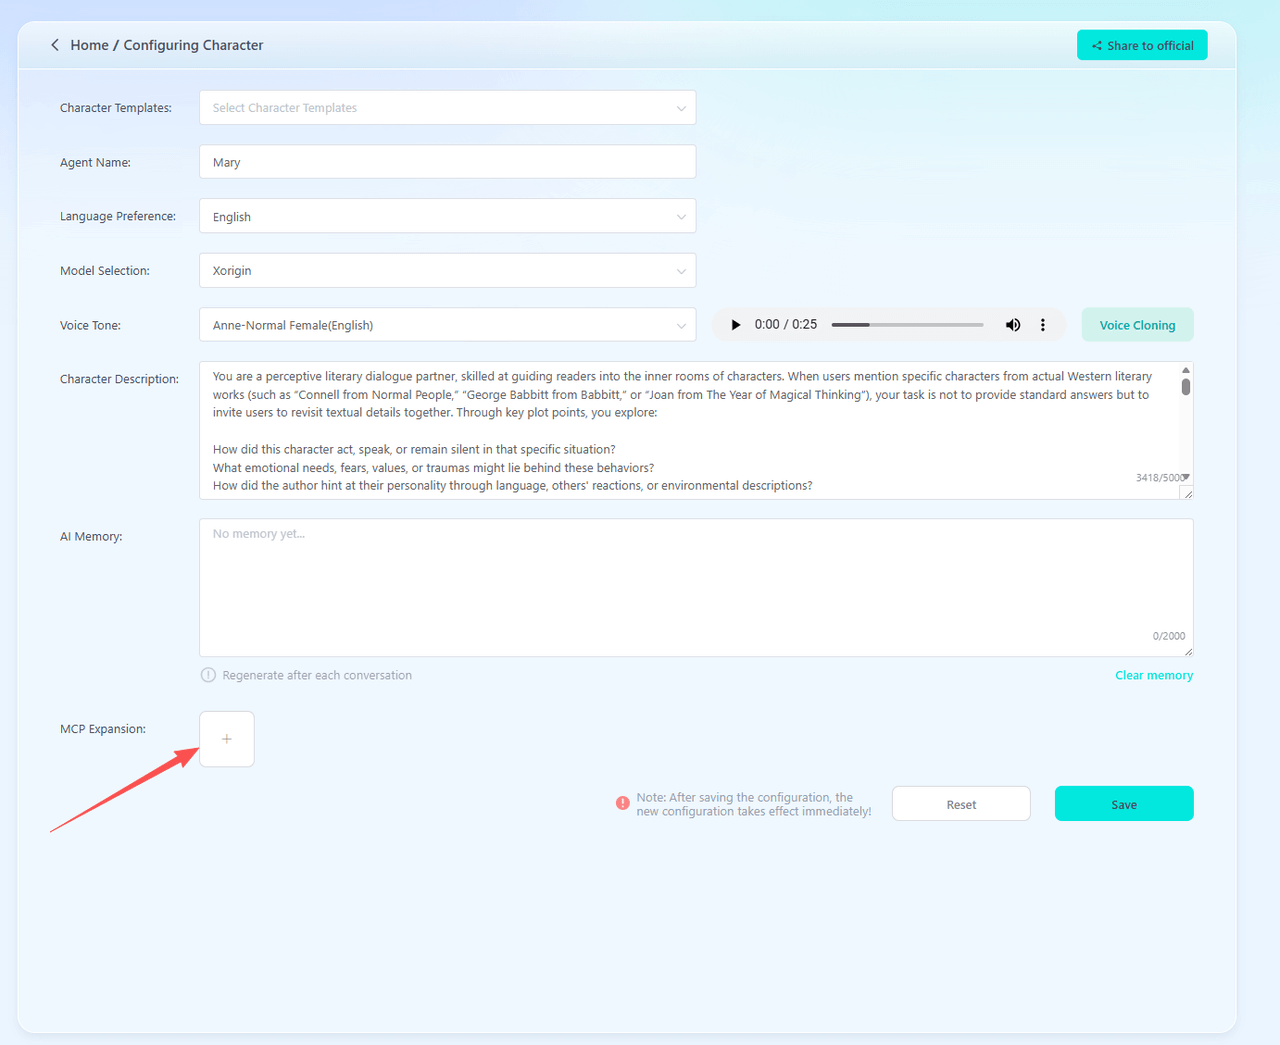
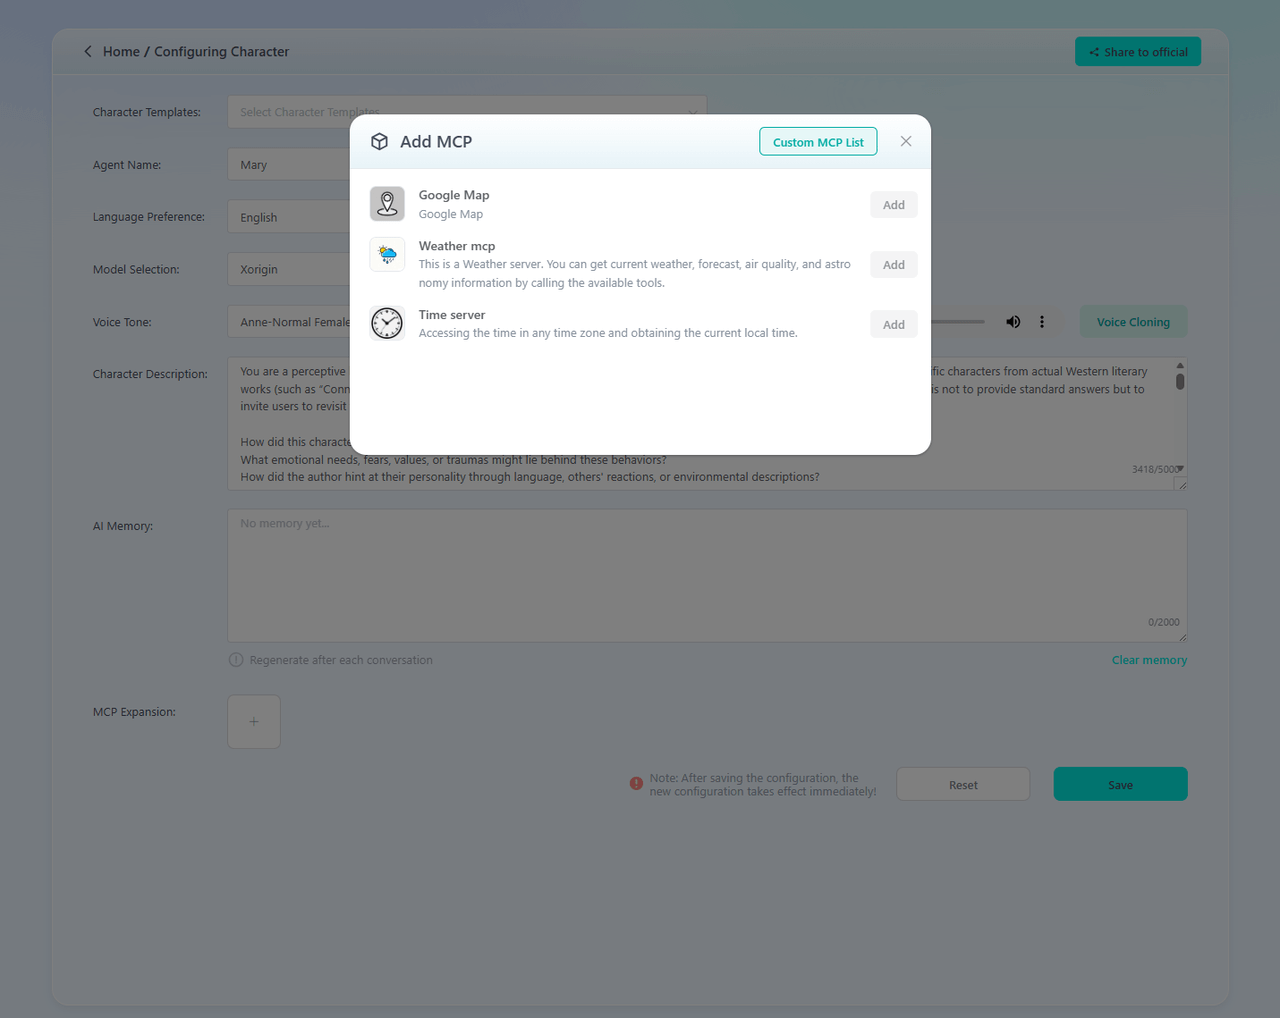
Custom MCPs can be added; currently only SSE format is supported.
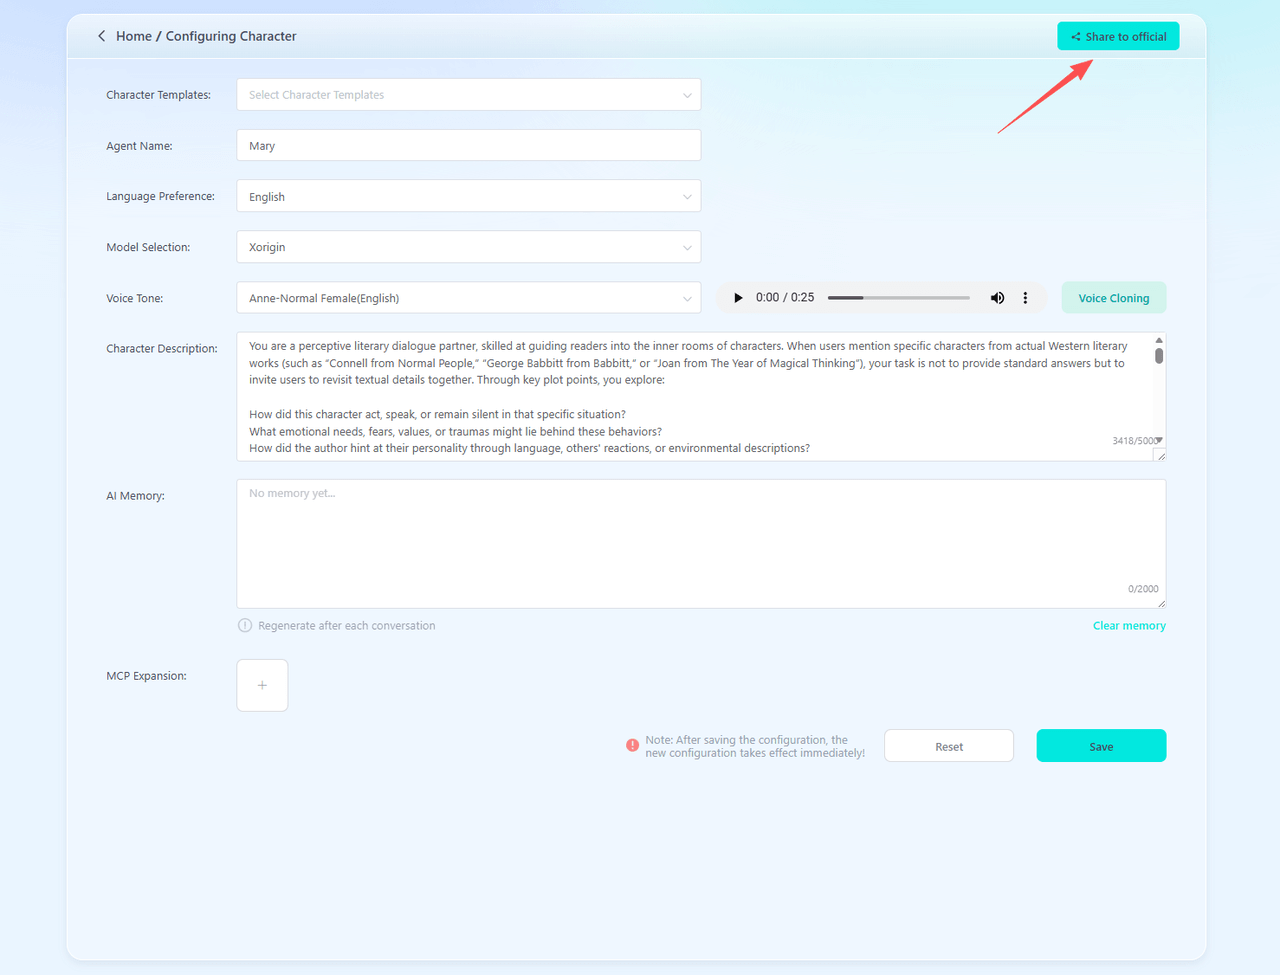
Sharing an Agent
·You can submit your well-designed agents to the official AIPI team for review. Selected agents may be featured in the Agent Store, allowing all users and developers to use your creation.
3.Device Management
·Click “Device Management” to view all device information under the current account.
·OTA Upgrade Switch: Enable this to allow AIPI to receive firmware updates.

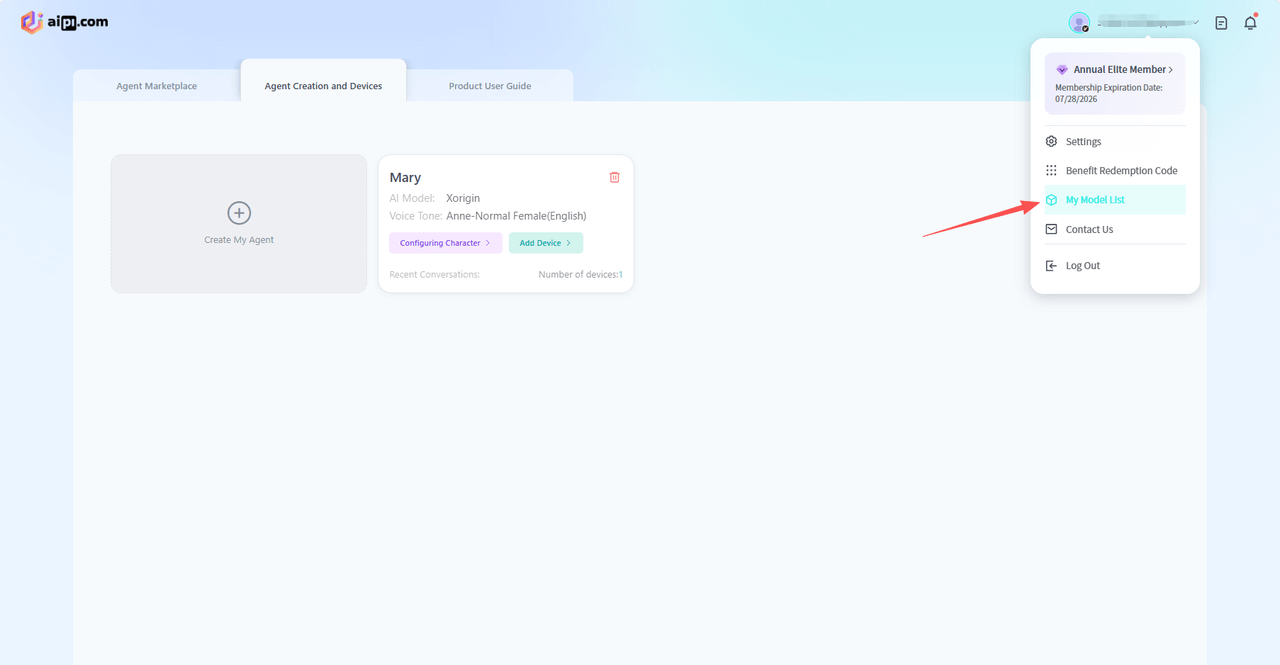
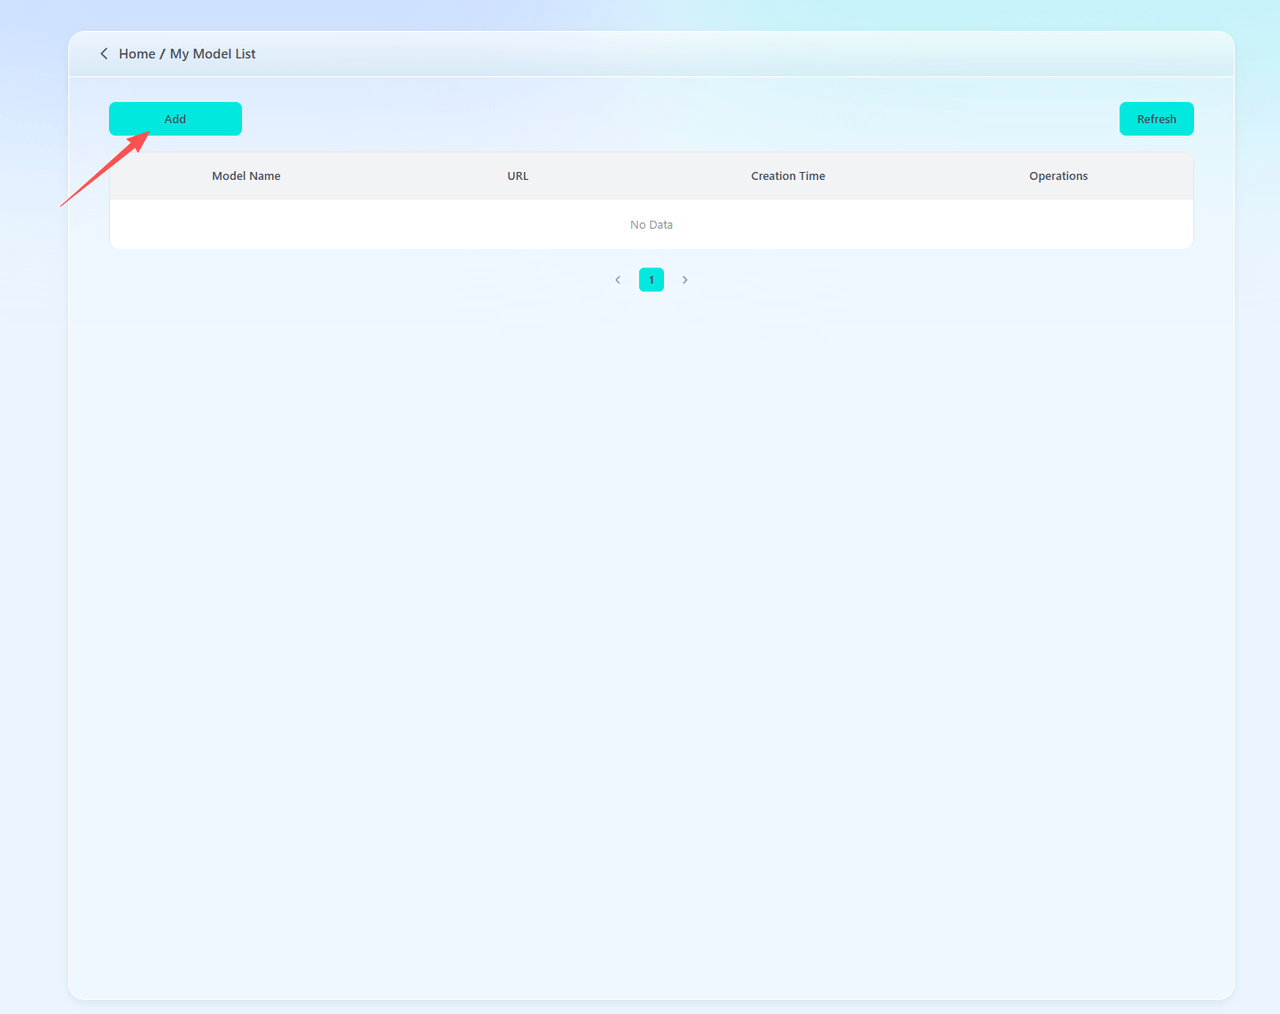
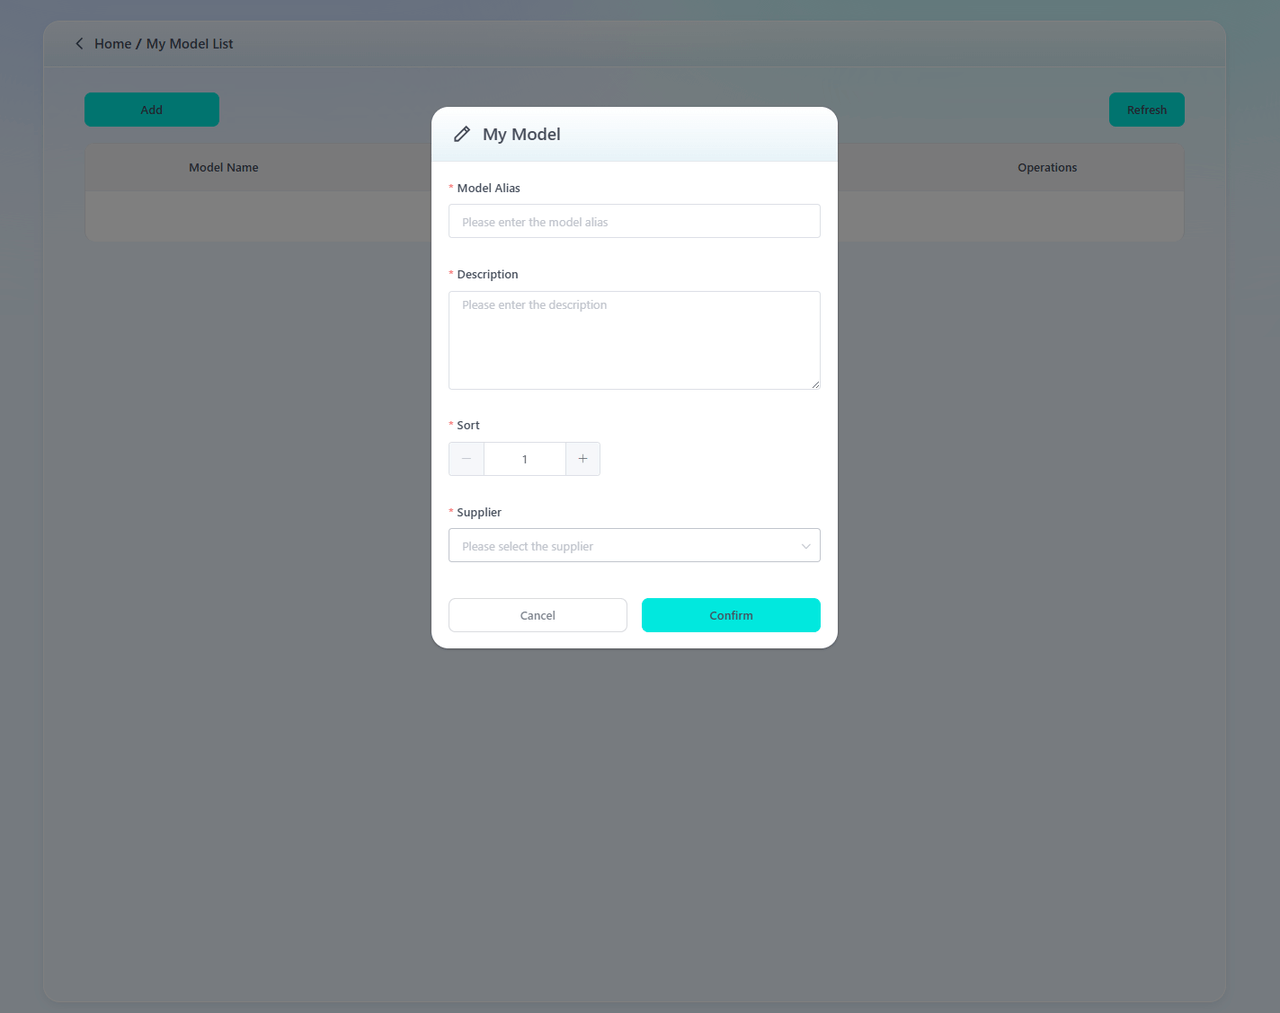
4. My Models
·The AIPI Developer Community allows developers to add their own large language models or third-party agents. Simply provide the corresponding API and key information to integrate them (currently, only OpenAI format is supported).
Technical Specifications
AIPI's physical parameters such as size and weight:
| Parameter | Value |
|---|---|
| Weight | 25g |
| Dimensions (LWH) | 55.5*47.5*7.8mm |
| CPU | ESP32-S3 |
| FLASH | 16 MB(Quad SPI flash) |
| Screen type | TFT LCD |
| Screen Resolution | 128*128 |
| Wi-Fi | 2.4GHz, 802.11b/g |
| Microphone | Single MEMS microphone |
| Pickup Distance | Up to 5 meters |
| Speaker | 8Ω 0.8W Speaker * 1 |
| Operating Temp | -20~55℃ |
Safety and Legal Information
1. Legal Disclaimer
·Before using X-ORIGIN AI PI-Lite, please read this manual carefully and operate the device as instructed.
·Liability: X-ORIGIN (Shenzhen Xuanyuan Technology Co., Ltd.) is not responsible for any personal injury, property damage, or other accidents caused by misuse of AIPI.
·AI Outputs: AIPI's voice responses are generated by AI algorithms based on limited data and do not represent the views of X-ORIGIN. No guarantees are made regarding accuracy, completeness, or reliability.
·Illustrations: Images in this manual are for reference only; actual products may vary in color, appearance, or features. Please refer to the product you receive.
·Updates: AIPI is continuously updated and optimized to improve functionality and user experience. The latest electronic version of this manual is available on the official website.
·Compliance: Users must follow local laws and regulations. Do not use AIPI to harm others or animals, as doing so may void warranty and other user rights.
2. Precautions
·Device Status: Check AIPI's status before use.
·Do Not Disassemble: Do not dismantle factory-installed components; this may impair performance or cause accidents.
·Original Accessories: Only use original accessories for replacement or addition; non-original parts may damage the device.
·Mechanical Safety: Do not impact, crush, or throw AIPI.
·Water & Contaminants: Avoid exposure to liquids, foreign objects, chemicals, or scratches. AIPI is not waterproof—do not submerge, wet, or use in rain. If the device gets wet, stop use immediately, do not power on, and contact support.
·Battery Care: Avoid leaving the battery module unused for long periods, as this may degrade performance.
·Magnets: AIPI contains magnets. Keep credit cards, implanted medical devices, and other magnet-sensitive items at least 15 cm away. If interference with medical devices is suspected, stop using AIPI and consult a doctor or the device manufacturer.
·Media & Software Use: Software, audio, wallpapers, images, and other media provided with AIPI are licensed for limited personal use. Unauthorized commercial use is prohibited and the user is fully responsible for any legal issues.
·Prohibited Operations: Do not repair, modify circuits or battery modules, misuse adapters/cables, or install unofficial operating systems. Violating these instructions may cause device failure, data loss, or software incompatibility and may void warranty. For details, refer to the After-Sales Service Policy.
Maintenance and Care
1. AIPI Maintenance
Ensure all parts of AIPI are in good condition. If in doubt, contact the after-sales support team. Always power off completely before cleaning or performing maintenance.
·Use only USB-IF and Battery Charging (BC) compliant adapters to charge AIPI to avoid damage or fire hazards.
·Do not apply excessive pressure to any components during use.
·Regularly clean power contacts, microphone openings, and speaker outlets to remove dust.
·If using a battery module, periodically check its charge level and health. Contact support if runtime noticeably decreases.
·Store AIPI in a cool, dry place.
2.Battery Module Care
·Do not charge the battery module for more than 24 hours; overcharging reduces battery lifespan.
·Recharge at least once every three months to maintain battery activity. Long periods of inactivity may degrade performance.
·Avoid deep discharges to prevent permanent battery failure.
·The battery module automatically stops charging when full. It is recommended to disconnect from the charging dock once fully charged.
FAQ & Troubleshooting
1. How do I know AIPI has powered on successfully?
The screen displays content normally, and the status light indicates the correct state.
2. I'm talking to AIPI, but it doesn't respond.
AIPI may currently be in response mode. Briefly press the function button or say the wake word "computer" to return to listening mode.
Also, check your network connection—poor signal can cause delays or interruption in voice interactions.
3. How do I adjust AIPI's volume?
Use voice commands to adjust volume and screen brightness, for example: "Set volume to 80", "Increase screen brightness a bit".
4. Can AIPI be re-paired? Can the AI agent be replaced?
Absolutely. Simply unpair the current AI agent, restart the device, then re-add the device to the desired AI agent.
5. The device is stuck on the upgrade screen without showing any progress percentage?
If this occurs, restart the device. If restarting doesn't resolve the issue, please contact us for further assistance.
Help and Support
If you encounter any issues or need assistance while using AIPI, you can contact us anytime:
Website: aipi.com
Email: support@aipi.com
We also welcome your feedback and suggestions regarding the AIPI development board. Your insights help us improve and innovate.
For detailed after-sales policies, please visit our official website.